No edit summary Tags: Visual edit apiedit |
|||
| (23 intermediate revisions by 14 users not shown) | |||
| Line 1: | Line 1: | ||
| + | {{CaseNav}} |
||
{{CaseInfobox |
{{CaseInfobox |
||
|name = Open Wounds |
|name = Open Wounds |
||
| Line 7: | Line 8: | ||
|city = [[Pacific Bay]] |
|city = [[Pacific Bay]] |
||
|datereleased = 28th August 2014 |
|datereleased = 28th August 2014 |
||
| − | |partner = [[Frank Knight]] |
+ | |partner = [[Frank Knight]] (All Chapters)<br />[[Andrea Marquez]] ([[Additional Investigation]]) |
|preceededby = [[Cloudy with a Chance of Murder]] |
|preceededby = [[Cloudy with a Chance of Murder]] |
||
|succeededby = [[Under the Thunderdome]] |
|succeededby = [[Under the Thunderdome]] |
||
| Line 14: | Line 15: | ||
==Plot== |
==Plot== |
||
| + | [[Frank Knight|Frank]] and the player ran out of gas near a Civil War reenactment battlefield, where they saw actor [[Joe Stanford]] being shot to death with a cannonball. |
||
| − | During the grand finale of the American Civil War reenactment show, [[Joe Stanford]], who was playing the role of [[Dexter Blade|Colonel Dexter Blade]], was unexpectedly shot by a cannonball on the stage, thus being killed instantly—prompting [[Frank Knight]] and the player to ship Joe's broken corpse to [[Roxie Sparks]] immediately. The cannonball tore Joe to pieces, grounds for Roxie to autopsy the body with great difficulty. A careful investigation incriminated [[Harriet Davis]], a school teacher in a Jazz Town school, as the killer of the reenactment actor. |
||
| + | Mid-investigation, [[Veronica Blade]] fired a cannon to pay homage to his ancestor, almost hitting the team. Furthermore, [[Stanley Bullock]] and his men aimed their cannons towards the Blade estate. The team found enough evidence to arrest teacher [[Harriet Davis]] for the murder. |
||
| − | Harriet abhorred violence, but when Frank had to go through the trouble of telling her about the mint julep residue she stained on the cannonball, she admitted to her transgression. Harriet didn't like the idea of what she saw as a rifle shooting practice invitation placed within school campus limits at a school she taught at and held strong beliefs that encouraging violence was not to the best of society's interests, but in spite of her beliefs, she was shipped to court. |
||
| + | Harriet denied the accusations but soon admitted to the crime. She was against violence and believed that the war reenactment would encourage it among society. When Joe placed a poster about a shooting practice near her school, Harriet decided it was the last straw, prompting her to shoot Joe with a cannon. [[Edward Dante|Judge Dante]] sentenced her to 20 years in jail. |
||
| − | As [[Edward Dante|Judge Dante]] led-off the hearing on an uncivilized note, Harriet told the court reenactments and rifle shooting practice classes that encourage violence are out-of-touch with society and took time to criticize Judge Dante for approving war-simulated reenactments to pave the way of a future without violence. Harriet then told Judge Dante that Stanford forgot the real reason the American Civil War erupted, but revealed her real motive for her crime: The Civil War should be remembered for preserving the Union and ensuing freedom for the slaves instead of honoring local Pacific Bay hero Dexter Blade, in which Harriet's ancestor was a slave and joined the Colored Brigade to aid the Union in defeating the Confederacy at all costs. |
||
| + | After the trial, [[Yann Toussaint|Yann]] suddenly left the police station. They looked for him at the Cannonball Saloon, where they found a recorded police interview that (per [[Russell Crane|Russell]]) showed that Stanley was a suspect in a previous [[Freddie Alonzo|Puppeteer]] investigation. Stanley said that Yann interrogated him to find new leads on the serial killer. |
||
| − | Harriet was sentenced to [[:File:Criminal Case Pacific Bay Case No.20 - Incarceration|20 years in county jail]] for the murder of Joe Stanford in spite of her non-violent crusade. |
||
| + | After Frank and the player helped Veronica to continue the reenactment, [[Hannah Choi|Hannah]] reported that [[Under the Thunderdome|another hurricane was heading for Jazz Town]]. |
||
| − | Meanwhile, [[Yann Toussaint]] committed an act of insubordination by interrogating Confederate reenactment actor [[Stanley Bullock]] in his bid to bring forth the mysterious serial killer known as "[[Freddie Alonzo|The Puppeteer]]" (responsible for the death of his parents) to justice—in this case [[Andrea Marquez|Chief Marquez]] and the player found an old [[Pacific Bay Police Department|police]] interview tape outside the saloon which recorded the interview of a Puppeteer suspect, who—thanks to [[Russell Crane]]—turned out to be none other than Stanley. Russell also managed to find out that Stanley was questioned because of being spotted near one of the crime scenes created by the Puppeteer, although he was proven innocent in the end. |
||
| + | ==Summary== |
||
| − | Realizing the reason as to why Yann led himself to question Stanley, Chief Marquez apologized to the reenactment actor for Yann's behavior. Moments later, Yann confronted Chief Marquez and the player only to apologize for his recent actions—in which Chief Marquez promised to fix his past with the help of her team. |
||
| − | |||
| − | Back in the station, a reunion between Chief Marquez, Frank, Yann, and the player was cut short when Hannah came out of nowhere to inform them about Hurricane Zelda heading towards Jazz Town—causing a moment of terror in which Chief Marquez instructed her squad to [[Under the Thunderdome|help Jazz Town evacuate]] before it was too late. |
||
| − | |||
| − | ==Stats== |
||
===[[:Category:Victims|Victim]]=== |
===[[:Category:Victims|Victim]]=== |
||
*'''Joe Stanford''' (shot by a cannonball on a reenactment battlefield) |
*'''Joe Stanford''' (shot by a cannonball on a reenactment battlefield) |
||
| Line 40: | Line 37: | ||
==[[:Category:Suspects|Suspects]]== |
==[[:Category:Suspects|Suspects]]== |
||
<gallery position="center"> |
<gallery position="center"> |
||
| − | + | PBCase20HDavis.png|[[Harriet Davis]] |
|
| − | + | PBCase20GStanford.png|[[Gwen Stanford]] |
|
| − | + | PBCase20WBillings.png|[[Wayne Billings]] |
|
| − | + | PBCase20VBlade.png|[[Veronica Blade]] |
|
| − | + | PBCase20SBullock.png|[[Stanley Bullock]] |
|
</gallery> |
</gallery> |
||
| Line 68: | Line 65: | ||
===Chapter 1=== |
===Chapter 1=== |
||
[[File:C76Chapter1.png|506x146px|border]] |
[[File:C76Chapter1.png|506x146px|border]] |
||
| − | *Investigate Reenactment Battlefield. ([[Evidence|Clues]]: Cannonball, Torn Tissue, Victim's Body; Murder Weapon |
+ | *Investigate Reenactment Battlefield. ([[Evidence|Clues]]: Cannonball, Torn Tissue, Victim's Body; Victim identified: Joe Stanford; Murder Weapon registered: Cannonball) |
| − | *Examine Torn Tissue. (Result: Napkin) |
+ | *Examine Torn Tissue. (Result: Napkin; New Crime Scene Unlocked: Saloon Entrance) |
*Investigate Saloon Entrance. (Prerequisite: Napkin restored; Clues: Faded Board, Locked Phone) |
*Investigate Saloon Entrance. (Prerequisite: Napkin restored; Clues: Faded Board, Locked Phone) |
||
*Examine Faded Board. (Result: Board Logo) |
*Examine Faded Board. (Result: Board Logo) |
||
| − | *Analyze Board Logo. (09:00:00) |
+ | *Analyze Board Logo. (09:00:00; New Suspect: Harriet Davis) |
*Question Harriet Davis about her anti-reenactment campaign. (Prerequisite: Board Logo analyzed) |
*Question Harriet Davis about her anti-reenactment campaign. (Prerequisite: Board Logo analyzed) |
||
| − | *Examine Locked Phone. (Result: Gwen Stanford |
+ | *Examine Locked Phone. (Result: Phone; New Suspect: Gwen Stanford) |
| − | *Tell Gwen Stanford about her father's death. (Prerequisite: |
+ | *Tell Gwen Stanford about her father's death. (Prerequisite: Phone unlocked) |
*Examine Cannonball. (Result: Cannonball Message) |
*Examine Cannonball. (Result: Cannonball Message) |
||
*Analyze Cannonball Message. (03:00:00; Attribute: The killer reads Abraham Lincoln) |
*Analyze Cannonball Message. (03:00:00; Attribute: The killer reads Abraham Lincoln) |
||
| − | *Autopsy Victim's Body (18:00:00; Attribute: The killer drinks mint julep; New Clue: Wooden Scraps) |
+ | *Autopsy Victim's Body. (18:00:00; Attribute: The killer drinks mint julep; New Clue: Wooden Scraps) |
| − | *Examine Wooden Scraps. (Result: Compass) |
+ | *Examine Wooden Scraps. (Result: Compass; New Suspect: Wayne Billings) |
*Ask Wayne Billings about the compass he gave to the victim. (Prerequisite: Compass restored) |
*Ask Wayne Billings about the compass he gave to the victim. (Prerequisite: Compass restored) |
||
| − | *Go to Chapter 2. (No [[stars]]) |
+ | *Go to Chapter 2. (No [[Stars|stars]]) |
===Chapter 2=== |
===Chapter 2=== |
||
[[File:C76Chapter2.png|506x146px|border]] |
[[File:C76Chapter2.png|506x146px|border]] |
||
| − | *Talk to Veronica Blade about her links to the investigation. (Available after unlocking Chapter 2) |
+ | *Talk to Veronica Blade about her links to the investigation. (Available after unlocking Chapter 2; Profile updated: Veronica drinks mint julep) |
*Investigate Blades' Estate. (Available after unlocking Chapter 2; Clues: Victim's Credit Card, Faded Paper) |
*Investigate Blades' Estate. (Available after unlocking Chapter 2; Clues: Victim's Credit Card, Faded Paper) |
||
*Examine Faded Paper. (Result: Reenactment Enlistment Form) |
*Examine Faded Paper. (Result: Reenactment Enlistment Form) |
||
| − | *Ask Wayne Billings why he was denied access to the reenactment. (Prerequisite: Reenactment Enlistment Form |
+ | *Ask Wayne Billings why he was denied access to the reenactment. (Prerequisite: Reenactment Enlistment Form unraveled; Profile updated: Wayne drinks mint julep and reads Abraham Lincoln) |
*Examine Victim's Credit Card. (Result: Credit Card Number) |
*Examine Victim's Credit Card. (Result: Credit Card Number) |
||
| − | *Analyze Credit Card Number. (12:00:00) |
+ | *Analyze Credit Card Number. (12:00:00; New Crime Scene Unlocked: Saloon Terrace) |
| − | *Confront Gwen Stanford about the theft of her father's credit card. (Prerequisite: Credit Card Number analyzed) |
+ | *Confront Gwen Stanford about the theft of her father's credit card. (Prerequisite: Credit Card Number analyzed; Profiles updated: Gwen drinks mint julep, Harriet drinks mint julep) |
*Investigate Saloon Terrace. (Prerequisite: Credit Card Number analyzed; Clues: Faded Document, Old Camera) |
*Investigate Saloon Terrace. (Prerequisite: Credit Card Number analyzed; Clues: Faded Document, Old Camera) |
||
*Examine Faded Document. (Result: Routine Map) |
*Examine Faded Document. (Result: Routine Map) |
||
| Line 98: | Line 95: | ||
*Examine Faded Picture. (Result: Unknown Suspect) |
*Examine Faded Picture. (Result: Unknown Suspect) |
||
*Examine Unknown Suspect. (New Suspect: Stanley Bullock) |
*Examine Unknown Suspect. (New Suspect: Stanley Bullock) |
||
| − | *Confront Stanley Bullock about the argument he had with the victim. (Prerequisite: Unknown Suspect |
+ | *Confront Stanley Bullock about the argument he had with the victim. (Prerequisite: Unknown Suspect identified to be Stanley; Profile updated: Stanley drinks mint julep and reads Abrahm Lincoln) |
*Go to Chapter 3. (No stars) |
*Go to Chapter 3. (No stars) |
||
===Chapter 3=== |
===Chapter 3=== |
||
[[File:C76Chapter3.png|506x146px|border]] |
[[File:C76Chapter3.png|506x146px|border]] |
||
| − | *Stop Stanley Bullock from causing a Confederate riot. (Available after unlocking Chapter 3) |
+ | *Stop Stanley Bullock from causing a Confederate riot. (Available after unlocking Chapter 3; Profile updated: Stanley plays chess) |
*Investigate Garden Bridge. (Available after unlocking Chapter 3; Clues: Stack of Weapons, Faded Bill) |
*Investigate Garden Bridge. (Available after unlocking Chapter 3; Clues: Stack of Weapons, Faded Bill) |
||
*Examine Stack of Weapons. (Result: Torn Paper) |
*Examine Stack of Weapons. (Result: Torn Paper) |
||
*Examine Torn Paper. (Result: Shooting Invitation) |
*Examine Torn Paper. (Result: Shooting Invitation) |
||
| − | *Ask Harriet Davis about the rifle shooting invitation. (Prerequisite: Shooting Invitation restored) |
+ | *Ask Harriet Davis about the rifle shooting invitation. (Prerequisite: Shooting Invitation restored; Profile updated: Harriet reads Abraham Lincoln and plays chess) |
*Examine Faded Bill. (Result: Repair Quote) |
*Examine Faded Bill. (Result: Repair Quote) |
||
*Analyze Repair Quote. (09:00:00) |
*Analyze Repair Quote. (09:00:00) |
||
| − | *Ask Veronica Blade about the repair quote she filed against the victim. (Prerequisite: Repair Quote analyzed) |
+ | *Ask Veronica Blade about the repair quote she filed against the victim. (Prerequisite: Repair Quote analyzed; Profile updated: Veronica reads Abraham Lincoln and plays chess) |
| − | *Investigate Battlefield Trench. (All tasks before |
+ | *Investigate Battlefield Trench. (All tasks before must be completed; Clues: Chess Box, Wooden Quadrant) |
*Examine Chess Box. (Result: Lighter) |
*Examine Chess Box. (Result: Lighter) |
||
*Analyze Lighter. (15:00:00; Attribute: The killer has sooted clothes) |
*Analyze Lighter. (15:00:00; Attribute: The killer has sooted clothes) |
||
| Line 122: | Line 119: | ||
[[File:C76Chapter4.png|506x146px|border]] |
[[File:C76Chapter4.png|506x146px|border]] |
||
*See if Veronica needs help. (Available after unlocking Additional Investigation) |
*See if Veronica needs help. (Available after unlocking Additional Investigation) |
||
| − | *Investigate Reenactment Battlefield. (Prerequisite: |
+ | *Investigate Reenactment Battlefield. (Prerequisite: Veronica interrogated; Clue: Torn Fabric) |
*Examine Torn Fabric. (Result: Uniform) |
*Examine Torn Fabric. (Result: Uniform) |
||
*Analyze Uniform. (09:00:00) |
*Analyze Uniform. (09:00:00) |
||
*Show Veronica how the Union uniform perfectly fits Frank. (Prerequisite: Uniform analyzed; Reward: '''[[Snacks|Burger]]''') |
*Show Veronica how the Union uniform perfectly fits Frank. (Prerequisite: Uniform analyzed; Reward: '''[[Snacks|Burger]]''') |
||
| − | *Investigate Blades' Estate. (Prerequisite: |
+ | *Investigate Blades' Estate. (Prerequisite: Veronica interrogated; Clue: Bird's Nest) |
*Examine Bird's Nest. (Result: Magnolia Flower) |
*Examine Bird's Nest. (Result: Magnolia Flower) |
||
*Show the complete costume to Veronica. (Prerequisite: Magnolia Flower found; Reward: <small>[MALE]</small> '''American Civil War Uniform''', <small>[FEMALE]</small> '''American 1860s Dress''') |
*Show the complete costume to Veronica. (Prerequisite: Magnolia Flower found; Reward: <small>[MALE]</small> '''American Civil War Uniform''', <small>[FEMALE]</small> '''American 1860s Dress''') |
||
*Examine Trashcan. (Available after unlocking Additional Investigation; Result: Saloon Coaster) |
*Examine Trashcan. (Available after unlocking Additional Investigation; Result: Saloon Coaster) |
||
| − | *Investigate Saloon Entrance. (Prerequisite: Saloon Coaster found; |
+ | *Investigate Saloon Entrance. (Prerequisite: Saloon Coaster found; Clue: Audio Tape) |
*Examine Audio Tape. (Result: Police Interview) |
*Examine Audio Tape. (Result: Police Interview) |
||
*Analyze Police Interview. (06:00:00) |
*Analyze Police Interview. (06:00:00) |
||
*Ask Stanley about the Puppeteer investigation. (Prerequisite: Police Interview analyzed; Reward: '''20,000 [[Coins]]''') |
*Ask Stanley about the Puppeteer investigation. (Prerequisite: Police Interview analyzed; Reward: '''20,000 [[Coins]]''') |
||
| − | *Move on to |
+ | *Move on to a [[Under the Thunderdome|new crime]]! (1 star) |
==Trivia== |
==Trivia== |
||
| Line 141: | Line 138: | ||
*In the "Saloon Terrace" crime scene, the man featuring on the wanted poster strongly resembles [[Wikipedia:Walter White (Breaking Bad)|Heisenberg]] from the popular American crime drama television series ''[[Wikipedia:Breaking Bad|Breaking Bad]]''. |
*In the "Saloon Terrace" crime scene, the man featuring on the wanted poster strongly resembles [[Wikipedia:Walter White (Breaking Bad)|Heisenberg]] from the popular American crime drama television series ''[[Wikipedia:Breaking Bad|Breaking Bad]]''. |
||
*Also in the "Saloon Terrace" crime scene, a poster of [[Wikipedia:Bruce Lee|Bruce Lee]] can be spotted. |
*Also in the "Saloon Terrace" crime scene, a poster of [[Wikipedia:Bruce Lee|Bruce Lee]] can be spotted. |
||
| + | *The plot of this case is based in the [[Wikipedia:American Civil War|American Civil War]], occurred between 1861 and 1865. |
||
==Navigation== |
==Navigation== |
||
{{Cases in Pacific Bay}} |
{{Cases in Pacific Bay}} |
||
[[Category:Cases]] |
[[Category:Cases]] |
||
| − | [[Category:Cases |
+ | [[Category:Cases in Pacific Bay]] |
[[Category:Jazz Town]] |
[[Category:Jazz Town]] |
||
Revision as of 18:19, 20 October 2018
| ◄ | General | ► |
Open Wounds is a case featured in Criminal Case, appearing as the seventy-sixth case of the game and the twentieth case of Pacific Bay. It takes place in Jazz Town, a district based in Pacific Bay.
Plot
Frank and the player ran out of gas near a Civil War reenactment battlefield, where they saw actor Joe Stanford being shot to death with a cannonball.
Mid-investigation, Veronica Blade fired a cannon to pay homage to his ancestor, almost hitting the team. Furthermore, Stanley Bullock and his men aimed their cannons towards the Blade estate. The team found enough evidence to arrest teacher Harriet Davis for the murder.
Harriet denied the accusations but soon admitted to the crime. She was against violence and believed that the war reenactment would encourage it among society. When Joe placed a poster about a shooting practice near her school, Harriet decided it was the last straw, prompting her to shoot Joe with a cannon. Judge Dante sentenced her to 20 years in jail.
After the trial, Yann suddenly left the police station. They looked for him at the Cannonball Saloon, where they found a recorded police interview that (per Russell) showed that Stanley was a suspect in a previous Puppeteer investigation. Stanley said that Yann interrogated him to find new leads on the serial killer.
After Frank and the player helped Veronica to continue the reenactment, Hannah reported that another hurricane was heading for Jazz Town.
Summary
Victim
- Joe Stanford (shot by a cannonball on a reenactment battlefield)
Murder Weapon
- Cannonball
Killer
- Harriet Davis
Suspects
")
")
")
")
")
Killer's Profile
- The killer drinks mint julep.
- The killer reads Abraham Lincoln.
- The killer plays chess.
- The killer wears a cotton flower.
- The killer has sooted clothes.

Crime Scenes
")
")
")
")
")
")
Steps
Chapter 1
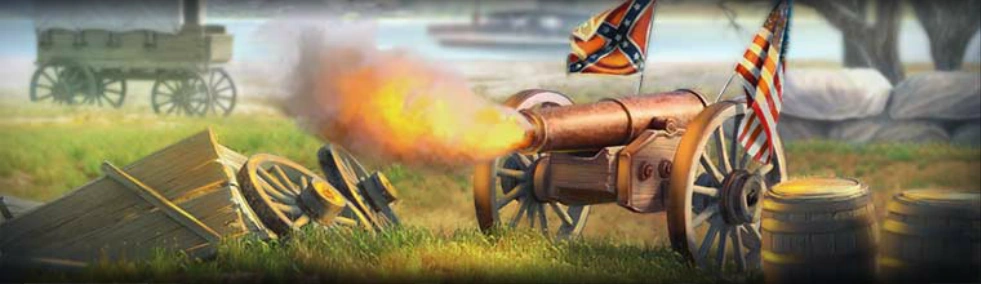
- Investigate Reenactment Battlefield. (Clues: Cannonball, Torn Tissue, Victim's Body; Victim identified: Joe Stanford; Murder Weapon registered: Cannonball)
- Examine Torn Tissue. (Result: Napkin; New Crime Scene Unlocked: Saloon Entrance)
- Investigate Saloon Entrance. (Prerequisite: Napkin restored; Clues: Faded Board, Locked Phone)
- Examine Faded Board. (Result: Board Logo)
- Analyze Board Logo. (09:00:00; New Suspect: Harriet Davis)
- Question Harriet Davis about her anti-reenactment campaign. (Prerequisite: Board Logo analyzed)
- Examine Locked Phone. (Result: Phone; New Suspect: Gwen Stanford)
- Tell Gwen Stanford about her father's death. (Prerequisite: Phone unlocked)
- Examine Cannonball. (Result: Cannonball Message)
- Analyze Cannonball Message. (03:00:00; Attribute: The killer reads Abraham Lincoln)
- Autopsy Victim's Body. (18:00:00; Attribute: The killer drinks mint julep; New Clue: Wooden Scraps)
- Examine Wooden Scraps. (Result: Compass; New Suspect: Wayne Billings)
- Ask Wayne Billings about the compass he gave to the victim. (Prerequisite: Compass restored)
- Go to Chapter 2. (No stars)
Chapter 2
- Talk to Veronica Blade about her links to the investigation. (Available after unlocking Chapter 2; Profile updated: Veronica drinks mint julep)
- Investigate Blades' Estate. (Available after unlocking Chapter 2; Clues: Victim's Credit Card, Faded Paper)
- Examine Faded Paper. (Result: Reenactment Enlistment Form)
- Ask Wayne Billings why he was denied access to the reenactment. (Prerequisite: Reenactment Enlistment Form unraveled; Profile updated: Wayne drinks mint julep and reads Abraham Lincoln)
- Examine Victim's Credit Card. (Result: Credit Card Number)
- Analyze Credit Card Number. (12:00:00; New Crime Scene Unlocked: Saloon Terrace)
- Confront Gwen Stanford about the theft of her father's credit card. (Prerequisite: Credit Card Number analyzed; Profiles updated: Gwen drinks mint julep, Harriet drinks mint julep)
- Investigate Saloon Terrace. (Prerequisite: Credit Card Number analyzed; Clues: Faded Document, Old Camera)
- Examine Faded Document. (Result: Routine Map)
- Analyze Routine Map. (12:00:00; Attribute: The killer plays chess)
- Examine Old Camera. (Result: Faded Picture)
- Examine Faded Picture. (Result: Unknown Suspect)
- Examine Unknown Suspect. (New Suspect: Stanley Bullock)
- Confront Stanley Bullock about the argument he had with the victim. (Prerequisite: Unknown Suspect identified to be Stanley; Profile updated: Stanley drinks mint julep and reads Abrahm Lincoln)
- Go to Chapter 3. (No stars)
Chapter 3

- Stop Stanley Bullock from causing a Confederate riot. (Available after unlocking Chapter 3; Profile updated: Stanley plays chess)
- Investigate Garden Bridge. (Available after unlocking Chapter 3; Clues: Stack of Weapons, Faded Bill)
- Examine Stack of Weapons. (Result: Torn Paper)
- Examine Torn Paper. (Result: Shooting Invitation)
- Ask Harriet Davis about the rifle shooting invitation. (Prerequisite: Shooting Invitation restored; Profile updated: Harriet reads Abraham Lincoln and plays chess)
- Examine Faded Bill. (Result: Repair Quote)
- Analyze Repair Quote. (09:00:00)
- Ask Veronica Blade about the repair quote she filed against the victim. (Prerequisite: Repair Quote analyzed; Profile updated: Veronica reads Abraham Lincoln and plays chess)
- Investigate Battlefield Trench. (All tasks before must be completed; Clues: Chess Box, Wooden Quadrant)
- Examine Chess Box. (Result: Lighter)
- Analyze Lighter. (15:00:00; Attribute: The killer has sooted clothes)
- Examine Wooden Quadrant. (Result: White Fibers)
- Analyze White Fibers. (09:00:00; Attribute: The killer wears a cotton flower.)
- Take care of the killer now!
- Go to Additional Investigation. (No stars)
Additional Investigation

- See if Veronica needs help. (Available after unlocking Additional Investigation)
- Investigate Reenactment Battlefield. (Prerequisite: Veronica interrogated; Clue: Torn Fabric)
- Examine Torn Fabric. (Result: Uniform)
- Analyze Uniform. (09:00:00)
- Show Veronica how the Union uniform perfectly fits Frank. (Prerequisite: Uniform analyzed; Reward: Burger)
- Investigate Blades' Estate. (Prerequisite: Veronica interrogated; Clue: Bird's Nest)
- Examine Bird's Nest. (Result: Magnolia Flower)
- Show the complete costume to Veronica. (Prerequisite: Magnolia Flower found; Reward: [MALE] American Civil War Uniform, [FEMALE] American 1860s Dress)
- Examine Trashcan. (Available after unlocking Additional Investigation; Result: Saloon Coaster)
- Investigate Saloon Entrance. (Prerequisite: Saloon Coaster found; Clue: Audio Tape)
- Examine Audio Tape. (Result: Police Interview)
- Analyze Police Interview. (06:00:00)
- Ask Stanley about the Puppeteer investigation. (Prerequisite: Police Interview analyzed; Reward: 20,000 Coins)
- Move on to a new crime! (1 star)
Trivia

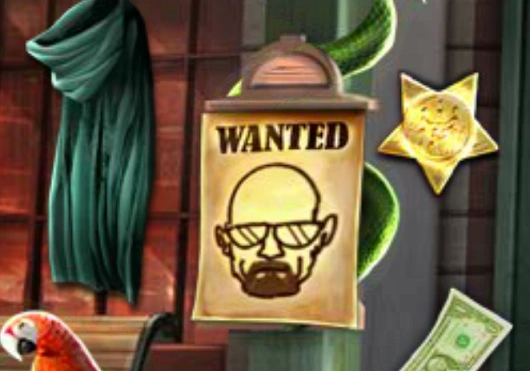
A close-up of the wanted poster highlighting a man extremely resemblant to Heisenberg.
- This is one of the cases in which both Frank and Amy interact with each other.
- In the "Saloon Terrace" crime scene, the man featuring on the wanted poster strongly resembles Heisenberg from the popular American crime drama television series Breaking Bad.
- Also in the "Saloon Terrace" crime scene, a poster of Bruce Lee can be spotted.
- The plot of this case is based in the American Civil War, occurred between 1861 and 1865.