Tags: Visual edit apiedit |
(→Trivia) Tag: Visual edit |
||
| (39 intermediate revisions by 15 users not shown) | |||
| Line 12: | Line 12: | ||
|succeededby = [[A Brave New World]]<br /><small>(in [[:Category:Airport|Airport]])</small> |
|succeededby = [[A Brave New World]]<br /><small>(in [[:Category:Airport|Airport]])</small> |
||
}} |
}} |
||
| − | '''It All Ends Here''' is a [[Cases|case]] featured in ''[[Criminal Case]]'', appearing as the fifty-first case of the game as well as the city of [[Grimsborough]], and the final |
+ | '''It All Ends Here''' is a [[Cases|case]] featured in ''[[Criminal Case]]'', appearing as the fifty-first case of the game as well as the city of [[Grimsborough]], and the final case to take place in the [[:Category:Maple Heights|Maple Heights]] district. |
==Plot== |
==Plot== |
||
| + | In the [[Grimsborough]] election day, [[Samuel King|Chief King]] sent the player and [[David Jones|Jones]] to the red party offices, [[Howard Johnson|Mayor Johnson]]'s Party to assure the security there. After going there, they fond the dead body of [[Adam Bentley]], a socialite they met before shot right between his eyes. |
||
| − | Socialite [[Adam Bentley]] was murdered by a gunshot right between his eyes inside the Red Party ([[Mayor Johnson]]'s party) offices on [[Grimsborough]]'s Election Day. In a shocking turn of events, [[Samuel King]], Chief of the [[Grimsborough Police Department]], was incriminated to be Adam's killer. |
||
| + | Mid investigation, [[Grimsborough Police Department|the team]] had no choice but to add Chief King in their suspect list and in a shocking turn of events, Chief Samuel King turned out to be Adam's killer. |
||
| ⚫ | Upon discovery of Samuel being the killer, the player took their partner, [[David Jones|Jones]], to the Chief's office to arrest Samuel, but Jones did not understand the reason as to why, but also refused to think Samuel would kill anyone. Much to Jones' disbelief, a guilty Samuel confessed that he indeed killed Adam Bentley. Jones still refused to believe it, citing that Adam never harmed the mayor. The chief countered that it had nothing to do with him. Jones went ahead and demanded answers from his former boss, which included explaining to [[Olivia Hall|Judge Hall]] why he did it. Samuel refused to |
||
| ⚫ | Upon discovery of Samuel being the killer, the player took their partner, [[David Jones|Jones]], to the Chief's office to arrest Samuel, but Jones did not understand the reason as to why, but also refused to think Samuel would kill anyone. Much to Jones' disbelief, a guilty Samuel confessed that he indeed killed Adam Bentley. Jones still refused to believe it, citing that Adam never harmed the mayor. The chief countered that it had nothing to do with him. Jones went ahead and demanded answers from his former boss, which included explaining to [[Olivia Hall|Judge Hall]] why he did it. Samuel refused to comply, telling his team to find their own answers as he pointed a gun at his head. Jones told Samuel not to commit suicide as punishment for Adam's murder, but Samuel felt that he had no choice. In his last words, the disgraced chief told the team that working with them had been an honor, before [[:File:Criminal Case Grimsborough Case No. 51 - Incarceration (Remastered)|shooting himself to death in a tragic outcome]]. |
||
| ⚫ | In the case's finale, [[Stuart Huckabee]] |
||
| + | |||
| ⚫ | In the case's finale, [[Stuart Huckabee]], a man who was known as the Chief's friend in his youth told the team (inside the police station) to go to the natural harbor and grab digging tools in order to seek the truth behind the murders happening in Grimsborough. Thus, the team proceeded to the [[:Category:Airport|Airport]] district to [[A Brave New World|investigate the natural harbor]] and eventually find out as to [[Ashes to Ashes|why Samuel committed suicide]] to avoid indictment, and it would also take the team some investigation before they find [[There Will Be Blood|the reasons for Adam being murdered]]. |
||
==Summary== |
==Summary== |
||
| Line 64: | Line 66: | ||
===Chapter 1=== |
===Chapter 1=== |
||
[[File:Case51chapter1.png|border]] |
[[File:Case51chapter1.png|border]] |
||
| − | *Investigate Red Party Offices. ([[Evidence|Clues]]: Victim's Body, Bar Receipt) |
+ | *Investigate Red Party Offices. ([[Evidence|Clues]]: Victim's Body, Bar Receipt; Victim identified: Adam Bentley; New Suspect: Howard Johnson) |
| − | *Autopsy |
+ | *Autopsy Victim's Body. (18:00:00; Attributes: The killer handles guns and is right-handed) |
| − | *Talk to Howard Johnson about the murder of Adam Bentley. (Prerequisite: |
+ | *Talk to Howard Johnson about the murder of Adam Bentley. (Prerequisite: Red Party Office investigated) |
| − | *Examine Bar Receipt. (Result: |
+ | *Examine Bar Receipt. (Result: Halifax Hotel Bar Receipt; New Crime Scene Unlocked: Hotel Lobby) |
| − | *Investigate Hotel Lobby. (Clue: Torn Ticket; |
+ | *Investigate Hotel Lobby. (Prerequisite: Halifax Hotel Bar Receipt unraveled; Clue: Torn Ticket; New Suspect: Martha Price) |
| − | *See if Martha Price knows about |
+ | *See if Martha Price knows about Adam's death. (Prerequisite: Hotel Lobby investigated) |
*Examine Torn Ticket. (Result: Plane Ticket) |
*Examine Torn Ticket. (Result: Plane Ticket) |
||
*Examine Plane Ticket. (Result: Credit Card Number) |
*Examine Plane Ticket. (Result: Credit Card Number) |
||
| − | *Analyze Credit Card Number. (06:00:00) |
+ | *Analyze Credit Card Number. (06:00:00; New Suspect: Lola Vallez) |
*Talk to Lola Vallez about the plane ticket she bought for Adam. (Prerequisite: Credit Card Number analyzed) |
*Talk to Lola Vallez about the plane ticket she bought for Adam. (Prerequisite: Credit Card Number analyzed) |
||
| − | *Examine Video Recording. ( |
+ | *Examine Video Recording. (All tasks before must be completed; Result: Martha Price) |
*Go to Chapter 2. (No [[stars]]) |
*Go to Chapter 2. (No [[stars]]) |
||
===Chapter 2=== |
===Chapter 2=== |
||
[[File:Case51chapter2.png|border]] |
[[File:Case51chapter2.png|border]] |
||
| − | *Interrogate Martha about her presence in the Mayor’s headquarters. (Available after unlocking Chapter 2) |
+ | *Interrogate Martha about her presence in the Mayor’s headquarters. (Available after unlocking Chapter 2; New Crime Scene Unlocked: Reception Desk) |
| − | *Investigate Reception Desk. ( |
+ | *Investigate Reception Desk. (Prerequisite: Martha interrogated; Clue: Lost & Found Box) |
*Examine Lost & Found Box. (Result: Notebook) |
*Examine Lost & Found Box. (Result: Notebook) |
||
*Examine Notebook. (Result: Adam's Writing) |
*Examine Notebook. (Result: Adam's Writing) |
||
| − | *Investigate Election Podium. (Clues: Trash Bag, Broken Statuette |
+ | *Investigate Election Podium. (Available after unlocking Chapter 2; Clues: Trash Bag, Broken Statuette) |
*Examine Trash Bag. (Result: Handgun) |
*Examine Trash Bag. (Result: Handgun) |
||
*Examine Handgun. (Result Serial Number) |
*Examine Handgun. (Result Serial Number) |
||
| − | *Analyze Serial Number. (12:00:00; Murder Weapon |
+ | *Analyze Serial Number. (12:00:00; Murder Weapon registere: Hand Gun; New Suspect: Tony Marconi) |
| − | *Talk to Marconi about the murder weapon. (Prerequisite: |
+ | *Talk to Marconi about the murder weapon. (Prerequisite: Serial Number analyzed; Profile updated: Tony handles guns) |
*Examine Broken Statuette. (Result: Garden Gnome) |
*Examine Broken Statuette. (Result: Garden Gnome) |
||
| − | *Analyze Garden Gnome. (12:00:00) |
+ | *Analyze Garden Gnome. (12:00:00; New Suspect: Serena Johnson) |
| − | *Talk to Serena Johnson about the spying garden gnome. (Prerequisite: Garden Gnome analyzed) |
+ | *Talk to Serena Johnson about the spying garden gnome. (Prerequisite: Garden Gnome analyzed; Profile updated: Serena handles guns) |
*Go to Chapter 3. (No stars) |
*Go to Chapter 3. (No stars) |
||
===Chapter 3=== |
===Chapter 3=== |
||
[[File:Case51chapter3.png|border]] |
[[File:Case51chapter3.png|border]] |
||
| − | *Talk to Chief King about his ties to the investigation. (Available after unlocking Chapter 3) |
+ | *Talk to Chief King about his ties to the investigation. (Available after unlocking Chapter 3; Profile updated: Samuel is right-handed and handles guns) |
| − | *Investigate Hotel Lobby. ( |
+ | *Investigate Hotel Lobby. (Prerequisite: Samuel interrogated; Clue: Lola's Photo) |
| − | *Examine |
+ | *Examine Lola's Photo. (Result: Fingerprint) |
| − | *Examine Fingerprint. (Result: Zack's Fingerprint) |
+ | *Examine Fingerprint. (Result: Zack's Fingerprint; New Suspect: Zack Holden) |
| − | *Talk to Zack Holden about |
+ | *Talk to Zack Holden about Lola's photo. (Prerequisite: Zack's Fingerprint identified; Profile updated: Zack is right-handed) |
| − | *Talk to Lola about her request to Zack Holden. (Prerequisite: |
+ | *Talk to Lola about her request to Zack Holden. (Prerequisite: Zack interrogated; Profile updated: Lola handles guns) |
| − | *Investigate |
+ | *Investigate Mayor's Desk. (Available after unlocking Chapter 3; Clues: Cigar, "I Voted" Badge, Faded Document) |
*Examine Cigar. (Result: Saliva) |
*Examine Cigar. (Result: Saliva) |
||
| − | *Analyze Saliva. (12:00:00) |
+ | *Analyze Saliva. (12:00:00; New Suspect: Alden Greene) |
| − | *Talk to Alden Greene about his visit to the Mayor. (Prerequisite: Saliva analyzed) |
+ | *Talk to Alden Greene about his visit to the Mayor. (Prerequisite: Saliva analyzed; Profile updated: Alden handles guns) |
| − | *Examine |
+ | *Examine "I Voted" Badge. (Result: Black Powder) |
| − | *Analyze Black Powder. (06:00:00; Attribute: |
+ | *Analyze Black Powder. (06:00:00; Attribute: The killer wears an "I VOTED" badge) |
*Examine Faded Document. (Result: Marconi's Files) |
*Examine Faded Document. (Result: Marconi's Files) |
||
*Talk to Howard about his friendship with Marconi. (Prerequisite: File on Marconi unraveled) |
*Talk to Howard about his friendship with Marconi. (Prerequisite: File on Marconi unraveled) |
||
| Line 113: | Line 115: | ||
===Chapter 4=== |
===Chapter 4=== |
||
[[File:Case51chapter4.png|border]] |
[[File:Case51chapter4.png|border]] |
||
| + | *Profiles updated: Howard is right-handed, Martha is right-handed, Tony is right-handed, Serena is right-handed |
||
| − | *Investigate Guest Tables. (Available after unlocking Chapter 4; |
+ | *Investigate Guest Tables. (Available after unlocking Chapter 4; Clue: Torn Speech) |
*Examine Torn Speech. (Result: Martha's Speech) |
*Examine Torn Speech. (Result: Martha's Speech) |
||
| − | *Talk to Martha about the |
+ | *Talk to Martha about the Mayor's speech. (Prerequisite: Torn Speech restored; Profile updated: Martha handles guns) |
| − | *Investigate Reception Desk. ( |
+ | *Investigate Reception Desk. (Prerequisite: Martha interrogated; Clue: Martha Bobblehead) |
*Examine Martha Bobblehead. (Result: Blood Sample) |
*Examine Martha Bobblehead. (Result: Blood Sample) |
||
| − | *Analyze Blood Sample. (12:00:00; Attribute: |
+ | *Analyze Blood Sample. (12:00:00; Attribute: The killer's blood is A+) |
| − | *Talk to Howard about his winning speech. (Prerequisite: |
+ | *Talk to Howard about his winning speech. (Prerequisite: Torn Speech restored) |
| − | *Investigate Red Party Offices. ( |
+ | *Investigate Red Party Offices. (Prerequisite: Howard interrogated; Clue: Dollar Bills) |
*Examine Dollar Bills. (Result: Molecule) |
*Examine Dollar Bills. (Result: Molecule) |
||
| − | *Analyze Molecule. (12:00:00; Attribute: |
+ | *Analyze Molecule. (12:00:00; Attribute: The killer is male) |
*Take care of the killer now! |
*Take care of the killer now! |
||
*Go to [[Additional Investigation]]. (No stars) |
*Go to [[Additional Investigation]]. (No stars) |
||
| Line 129: | Line 132: | ||
[[File:Case51chapter5.png|border]] |
[[File:Case51chapter5.png|border]] |
||
*Ask Serena Johnson about the Chief. (Available after unlocking Additional Investigation) |
*Ask Serena Johnson about the Chief. (Available after unlocking Additional Investigation) |
||
| − | *Investigate Red Party Offices. ( |
+ | *Investigate Red Party Offices. (Prerequisite: Serena interrogated; Clue: Serena's Wallet) |
*Examine Serena’s Wallet. (Result: Serena's Picture) |
*Examine Serena’s Wallet. (Result: Serena's Picture) |
||
*Analyze Serena’s Picture. (06:00:00) |
*Analyze Serena’s Picture. (06:00:00) |
||
| − | *Ask Serena Johnson about Stuart Huckabee. (Reward: '''[[Snacks|Burger]]''') |
+ | *Ask Serena Johnson about Stuart Huckabee. (Prerequisite: Serena's Picture analyzed; Reward: '''[[Snacks|Burger]]''') |
| − | *Investigate Election Podium. ( |
+ | *Investigate Election Podium. (Clue: Faded Medal) |
*Examine Faded Medal. (Result: Chief's Medal) |
*Examine Faded Medal. (Result: Chief's Medal) |
||
| − | *Ask Howard Johnson about the |
+ | *Ask Howard Johnson about the Chief's medal. (Prerequisite: Chief's Medal unraveled; Rewards: '''18,000 [[Coins]], Police Chief Uniform, Police Chief Hat''') |
| − | *Move on to |
+ | *Move on to a [[A Brave New World|new crime]] (in [[:Category: Airport|Airport]])! (No stars) |
==Trivia== |
==Trivia== |
||
| − | *This is the only case which features eight suspects instead of the usual five. |
+ | *This is the only case in the game which features eight suspects instead of the usual five. |
| − | *This is the only case with five chapters (including the [[Additional Investigation]]) instead of the usual four. |
+ | *This is the only case in the game with five chapters (including the [[Additional Investigation]]) instead of the usual four. |
*This is one of the game's cases in which a [[:Category:Main Characters|main character]] is flagged as a suspect for a plausible reason, who later turns out to be the case's killer. |
*This is one of the game's cases in which a [[:Category:Main Characters|main character]] is flagged as a suspect for a plausible reason, who later turns out to be the case's killer. |
||
| − | **In addition, like [[Bomb Alert on Grimsborough]], the killer commits suicide to avoid indictment |
+ | **In addition, like [[Bomb Alert on Grimsborough]], the killer commits suicide to avoid indictment. |
| − | **As opposed to [[A Killer Among Us]], the killer committed suicide. |
||
*This is one of the only final cases of a district in which the killer does not appear as a suspect previously. |
*This is one of the only final cases of a district in which the killer does not appear as a suspect previously. |
||
| − | *This is one of |
+ | *This is one of four cases in Grimsborough where all suspects have appeared previously. |
| + | *Due to [[:Category:Stickers|sticker pages]] only having the capacity for five suspects on "The Suspects" page, this case is one of two cases wherein not all suspects have stickers, the other being [[The Darkest Hour]]. |
||
| ⚫ | |||
| + | **In this case, there are no suspect stickers for Lola, Zack, and Alden. |
||
| + | **Furthermore, due to the sticker pages only having the capacity for three chapter stickers, there is no sticker for Chapter 4. |
||
| + | *In the "Election Podium" crime scene, can be spotted: |
||
| ⚫ | |||
| + | **A bobblehead of [[Wikipedia:Abraham Lincoln|Abraham Lincoln]]. |
||
| + | **A mouse doll, reminiscent of the classic character [[Wikipedia:Mickey Mouse|Mickey Mouse]]. |
||
| + | **A replica of the [[Wikipedia:Statue of Liberty|Statue of Liberty]]. She can also be spotted in the "Red Party Offices" and "Guest Tables" crime scenes. |
||
| + | *In the "Guest Tables" crime scene, a war poster with [[Wikipedia:Uncle Sam|Uncle Sam]] can be spotted. |
||
==Navigation== |
==Navigation== |
||
{{Cases in Grimsborough}} |
{{Cases in Grimsborough}} |
||
[[Category:Cases]] |
[[Category:Cases]] |
||
| − | [[Category:Cases |
+ | [[Category:Cases in Grimsborough]] |
[[Category:Maple Heights]] |
[[Category:Maple Heights]] |
||
Revision as of 03:11, 11 March 2020
| ◄ | General | ► |
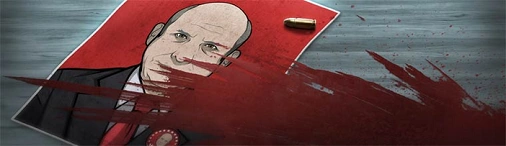
It All Ends Here is a case featured in Criminal Case, appearing as the fifty-first case of the game as well as the city of Grimsborough, and the final case to take place in the Maple Heights district.
Plot
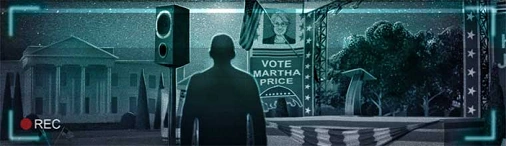
In the Grimsborough election day, Chief King sent the player and Jones to the red party offices, Mayor Johnson's Party to assure the security there. After going there, they fond the dead body of Adam Bentley, a socialite they met before shot right between his eyes.
Mid investigation, the team had no choice but to add Chief King in their suspect list and in a shocking turn of events, Chief Samuel King turned out to be Adam's killer.
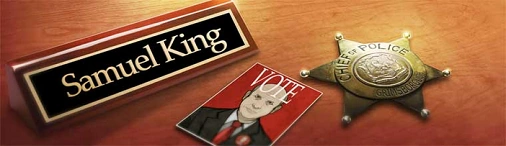
Upon discovery of Samuel being the killer, the player took their partner, Jones, to the Chief's office to arrest Samuel, but Jones did not understand the reason as to why, but also refused to think Samuel would kill anyone. Much to Jones' disbelief, a guilty Samuel confessed that he indeed killed Adam Bentley. Jones still refused to believe it, citing that Adam never harmed the mayor. The chief countered that it had nothing to do with him. Jones went ahead and demanded answers from his former boss, which included explaining to Judge Hall why he did it. Samuel refused to comply, telling his team to find their own answers as he pointed a gun at his head. Jones told Samuel not to commit suicide as punishment for Adam's murder, but Samuel felt that he had no choice. In his last words, the disgraced chief told the team that working with them had been an honor, before shooting himself to death in a tragic outcome.
In the case's finale, Stuart Huckabee, a man who was known as the Chief's friend in his youth told the team (inside the police station) to go to the natural harbor and grab digging tools in order to seek the truth behind the murders happening in Grimsborough. Thus, the team proceeded to the Airport district to investigate the natural harbor and eventually find out as to why Samuel committed suicide to avoid indictment, and it would also take the team some investigation before they find the reasons for Adam being murdered.
Summary
Victim
- Adam Bentley (killed by a gunshot right between the eyes)
Murder Weapon
- Handgun
Killer
- Samuel King
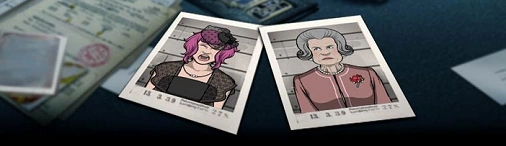
Suspects
")
")
")
")
")
")
")
")
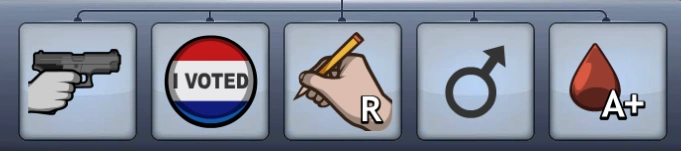
Killer's Profile
- The killer handles guns.
- The killer wears a badge.
- The killer is right-handed.
- The killer is male.
- The killer's blood type is A+.
Crime Scenes
")
.PNG "C51-CS1(2).PNG (2.36 MB)")
")
.PNG "C51-CS2(2).PNG (2.43 MB)")
")
.PNG "C51-CS3(2).PNG (2.48 MB)")
Steps
Chapter 1
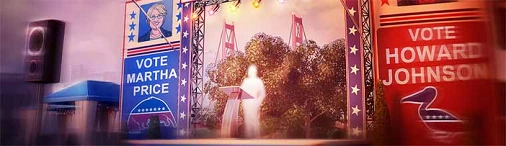
- Investigate Red Party Offices. (Clues: Victim's Body, Bar Receipt; Victim identified: Adam Bentley; New Suspect: Howard Johnson)
- Autopsy Victim's Body. (18:00:00; Attributes: The killer handles guns and is right-handed)
- Talk to Howard Johnson about the murder of Adam Bentley. (Prerequisite: Red Party Office investigated)
- Examine Bar Receipt. (Result: Halifax Hotel Bar Receipt; New Crime Scene Unlocked: Hotel Lobby)
- Investigate Hotel Lobby. (Prerequisite: Halifax Hotel Bar Receipt unraveled; Clue: Torn Ticket; New Suspect: Martha Price)
- See if Martha Price knows about Adam's death. (Prerequisite: Hotel Lobby investigated)
- Examine Torn Ticket. (Result: Plane Ticket)
- Examine Plane Ticket. (Result: Credit Card Number)
- Analyze Credit Card Number. (06:00:00; New Suspect: Lola Vallez)
- Talk to Lola Vallez about the plane ticket she bought for Adam. (Prerequisite: Credit Card Number analyzed)
- Examine Video Recording. (All tasks before must be completed; Result: Martha Price)
- Go to Chapter 2. (No stars)
Chapter 2
- Interrogate Martha about her presence in the Mayor’s headquarters. (Available after unlocking Chapter 2; New Crime Scene Unlocked: Reception Desk)
- Investigate Reception Desk. (Prerequisite: Martha interrogated; Clue: Lost & Found Box)
- Examine Lost & Found Box. (Result: Notebook)
- Examine Notebook. (Result: Adam's Writing)
- Investigate Election Podium. (Available after unlocking Chapter 2; Clues: Trash Bag, Broken Statuette)
- Examine Trash Bag. (Result: Handgun)
- Examine Handgun. (Result Serial Number)
- Analyze Serial Number. (12:00:00; Murder Weapon registere: Hand Gun; New Suspect: Tony Marconi)
- Talk to Marconi about the murder weapon. (Prerequisite: Serial Number analyzed; Profile updated: Tony handles guns)
- Examine Broken Statuette. (Result: Garden Gnome)
- Analyze Garden Gnome. (12:00:00; New Suspect: Serena Johnson)
- Talk to Serena Johnson about the spying garden gnome. (Prerequisite: Garden Gnome analyzed; Profile updated: Serena handles guns)
- Go to Chapter 3. (No stars)
Chapter 3
- Talk to Chief King about his ties to the investigation. (Available after unlocking Chapter 3; Profile updated: Samuel is right-handed and handles guns)
- Investigate Hotel Lobby. (Prerequisite: Samuel interrogated; Clue: Lola's Photo)
- Examine Lola's Photo. (Result: Fingerprint)
- Examine Fingerprint. (Result: Zack's Fingerprint; New Suspect: Zack Holden)
- Talk to Zack Holden about Lola's photo. (Prerequisite: Zack's Fingerprint identified; Profile updated: Zack is right-handed)
- Talk to Lola about her request to Zack Holden. (Prerequisite: Zack interrogated; Profile updated: Lola handles guns)
- Investigate Mayor's Desk. (Available after unlocking Chapter 3; Clues: Cigar, "I Voted" Badge, Faded Document)
- Examine Cigar. (Result: Saliva)
- Analyze Saliva. (12:00:00; New Suspect: Alden Greene)
- Talk to Alden Greene about his visit to the Mayor. (Prerequisite: Saliva analyzed; Profile updated: Alden handles guns)
- Examine "I Voted" Badge. (Result: Black Powder)
- Analyze Black Powder. (06:00:00; Attribute: The killer wears an "I VOTED" badge)
- Examine Faded Document. (Result: Marconi's Files)
- Talk to Howard about his friendship with Marconi. (Prerequisite: File on Marconi unraveled)
- Go to Chapter 4. (No stars)
Chapter 4
- Profiles updated: Howard is right-handed, Martha is right-handed, Tony is right-handed, Serena is right-handed
- Investigate Guest Tables. (Available after unlocking Chapter 4; Clue: Torn Speech)
- Examine Torn Speech. (Result: Martha's Speech)
- Talk to Martha about the Mayor's speech. (Prerequisite: Torn Speech restored; Profile updated: Martha handles guns)
- Investigate Reception Desk. (Prerequisite: Martha interrogated; Clue: Martha Bobblehead)
- Examine Martha Bobblehead. (Result: Blood Sample)
- Analyze Blood Sample. (12:00:00; Attribute: The killer's blood is A+)
- Talk to Howard about his winning speech. (Prerequisite: Torn Speech restored)
- Investigate Red Party Offices. (Prerequisite: Howard interrogated; Clue: Dollar Bills)
- Examine Dollar Bills. (Result: Molecule)
- Analyze Molecule. (12:00:00; Attribute: The killer is male)
- Take care of the killer now!
- Go to Additional Investigation. (No stars)
Additional Investigation
- Ask Serena Johnson about the Chief. (Available after unlocking Additional Investigation)
- Investigate Red Party Offices. (Prerequisite: Serena interrogated; Clue: Serena's Wallet)
- Examine Serena’s Wallet. (Result: Serena's Picture)
- Analyze Serena’s Picture. (06:00:00)
- Ask Serena Johnson about Stuart Huckabee. (Prerequisite: Serena's Picture analyzed; Reward: Burger)
- Investigate Election Podium. (Clue: Faded Medal)
- Examine Faded Medal. (Result: Chief's Medal)
- Ask Howard Johnson about the Chief's medal. (Prerequisite: Chief's Medal unraveled; Rewards: 18,000 Coins, Police Chief Uniform, Police Chief Hat)
- Move on to a new crime (in Airport)! (No stars)
Trivia
- This is the only case in the game which features eight suspects instead of the usual five.
- This is the only case in the game with five chapters (including the Additional Investigation) instead of the usual four.
- This is one of the game's cases in which a main character is flagged as a suspect for a plausible reason, who later turns out to be the case's killer.
- In addition, like Bomb Alert on Grimsborough, the killer commits suicide to avoid indictment.
- This is one of the only final cases of a district in which the killer does not appear as a suspect previously.
- This is one of four cases in Grimsborough where all suspects have appeared previously.
- Due to sticker pages only having the capacity for five suspects on "The Suspects" page, this case is one of two cases wherein not all suspects have stickers, the other being The Darkest Hour.
- In this case, there are no suspect stickers for Lola, Zack, and Alden.
- Furthermore, due to the sticker pages only having the capacity for three chapter stickers, there is no sticker for Chapter 4.
- In the "Election Podium" crime scene, can be spotted:
- An artwork depicting a bobblehead of Elvis Presley.
- A bobblehead of Abraham Lincoln.
- A mouse doll, reminiscent of the classic character Mickey Mouse.
- A replica of the Statue of Liberty. She can also be spotted in the "Red Party Offices" and "Guest Tables" crime scenes.
- In the "Guest Tables" crime scene, a war poster with Uncle Sam can be spotted.