No edit summary Tag: Visual edit |
(Unneeded, due to repeated trivia down below.) |
||
| (21 intermediate revisions by 6 users not shown) | |||
| Line 1: | Line 1: | ||
{{CaseNav}} |
{{CaseNav}} |
||
| − | {{New}} |
||
{{CaseInfobox |
{{CaseInfobox |
||
|name = Head Case |
|name = Head Case |
||
| Line 11: | Line 10: | ||
|partner = [[Gloria Hayes]] (All Chapters)<br />[[Gabriel Herrera]] (1 task in Chapter 1 & [[Additional Investigation|To the Stars 4]])<br />[[David Jones]] (1 task in Chapter 1) |
|partner = [[Gloria Hayes]] (All Chapters)<br />[[Gabriel Herrera]] (1 task in Chapter 1 & [[Additional Investigation|To the Stars 4]])<br />[[David Jones]] (1 task in Chapter 1) |
||
|preceededby = [[Out of Breath]] |
|preceededby = [[Out of Breath]] |
||
| − | |succeededby = |
+ | |succeededby = [[Playing Dead]] |
}} |
}} |
||
'''Head Case''' is a [[Cases|case]] featured in ''[[Criminal Case]]'' as the fifty-second case of [[The Conspiracy]] (Season 5) and the two-hundred eighty-third case overall. It takes place in the [[:Category:Airport (The Conspiracy)|Airport]] district of [[Grimsborough (The Conspiracy)|Grimsborough]]. |
'''Head Case''' is a [[Cases|case]] featured in ''[[Criminal Case]]'' as the fifty-second case of [[The Conspiracy]] (Season 5) and the two-hundred eighty-third case overall. It takes place in the [[:Category:Airport (The Conspiracy)|Airport]] district of [[Grimsborough (The Conspiracy)|Grimsborough]]. |
||
| Line 20: | Line 19: | ||
Mid-investigation, the team (along with orderly [[Tobias Randall]]) calmed down a group of distressed patients who had learned of Zoe's death. Later, a grieving Jones told the team that he was going to murder Zoe's killer before breaking down into tears again, causing Gabriel to lead him back to his office. The team would then find enough clues to arrest news reporter [[Louis Leroux]] for the murder. |
Mid-investigation, the team (along with orderly [[Tobias Randall]]) calmed down a group of distressed patients who had learned of Zoe's death. Later, a grieving Jones told the team that he was going to murder Zoe's killer before breaking down into tears again, causing Gabriel to lead him back to his office. The team would then find enough clues to arrest news reporter [[Louis Leroux]] for the murder. |
||
| − | Upon admitting to the murder, Louis explained that he had caught Zoe telekinetically levitating a teacup when he showed up in Zoe's room unannounced. Connecting her abilities to her time under the dome and realizing it was his duty to uncover the whole truth, Louis then asked to examine the extent of her condition. Zoe, freaking out at the prospect of more tests performed upon her, started screaming. In a panic over getting kicked out, Louis grabbed a fence post and smashed her head in to keep her quiet. [[Judge Powell]] sentenced an apologetic Louis to life in prison. Post-trial, the team rushed Jones to the hospital after he had attempted suicide via overdose on sedatives. |
+ | Upon admitting to the murder, Louis explained that he had caught Zoe telekinetically levitating a teacup when he showed up in Zoe's room unannounced. Connecting her abilities to her time under the dome and realizing it was his duty to uncover the whole truth, Louis then asked to examine the extent of her condition. Zoe, freaking out at the prospect of more tests performed upon her, started screaming. In a panic over getting kicked out, Louis grabbed a fence post and smashed her head in to keep her quiet. [[Judith Powell|Judge Powell]] sentenced an apologetic Louis to life in prison. Post-trial, the team rushed Jones to the hospital after he had attempted suicide via overdose on sedatives. |
| − | Gabriel and the player went to the hospital common room and found a bottle of flumazenil, which [[Amir Devani|Amir]] used to synthesize an antidote to the sedatives in Jones' |
+ | Gabriel and the player went to the hospital common room and found a bottle of flumazenil, which [[Amir Devani|Amir]] used to synthesize an antidote to the sedatives in Jones' system. After talking to a now-conscious Jones and to [[Dr Jennifer Russo]] for advice, the team went back to Zoe's room and found the letters Zoe had written to Jones as part of her therapy. The team then showed the letters to Jones and convinced him that Zoe would have wanted him to be happy, giving Jones back the will to fight for his life. |
| − | Meanwhile, Louis told Gloria and the player that he had installed a hidden camera in Zoe's room to record her telekinesis. The team found the camera which contained a recording of Zoe moving a teacup hands-free, corroborating Louis' |
+ | Meanwhile, Louis told Gloria and the player that he had installed a hidden camera in Zoe's room to record her telekinesis. The team found the camera which contained a recording of Zoe moving a teacup hands-free, corroborating Louis' claims. [[Diane Parker|Chief Parker]] then authorized [[Martine Meunier|Martine]] to autopsy Zoe once again, whereupon she found that Zoe's occipital lobe was exposed to a different Berzelium derivative than Protozane, confirming her exposure to the superhuman serum. [[Jasper Everett]] then told the team that the telekinesis was merely a side effect of the drug. |
| − | After all the events, the team decided to go to the TV station to look further into Louis' |
+ | After all the events, the team decided to [[Playing Dead|go to the TV station]] to look further into Louis' findings. |
==Summary== |
==Summary== |
||
| Line 43: | Line 42: | ||
C283P2.png|[[Kai Gruber]] |
C283P2.png|[[Kai Gruber]] |
||
C283P3.png|[[Dr Jennifer Russo]] |
C283P3.png|[[Dr Jennifer Russo]] |
||
| − | + | C283P4New.PNG|[[Louis Leroux]] |
|
C283P5.png|[[Rosamund Wilcox]] |
C283P5.png|[[Rosamund Wilcox]] |
||
</gallery> |
</gallery> |
||
| Line 62: | Line 61: | ||
==[[Crime Scenes]]== |
==[[Crime Scenes]]== |
||
| ⚫ | |||
| − | {{Under Construction}} |
||
| ⚫ | |||
C283CS1A.png|Hospital Courtyard |
C283CS1A.png|Hospital Courtyard |
||
| + | C283CS1B.jpg|Courtyard Statue |
||
C283CS2A.png|Zoe's Room |
C283CS2A.png|Zoe's Room |
||
| + | C283CS2B.jpg|Zoe's Desk |
||
| + | C283CS3A.jpg|Common Room |
||
| + | C283CS3B.jpg|Board Game Area |
||
</gallery> |
</gallery> |
||
| Line 74: | Line 76: | ||
*Investigate Hospital Courtyard again. (Prerequisite: Hospital Courtyard investigated; Clues: Set of Keys, Gardening Equipment) |
*Investigate Hospital Courtyard again. (Prerequisite: Hospital Courtyard investigated; Clues: Set of Keys, Gardening Equipment) |
||
*Examine Set of Keys. (New Suspect: Tobias Randall) |
*Examine Set of Keys. (New Suspect: Tobias Randall) |
||
| − | *Find out what Tobias Randall knows about the murder. (Prerequisite: T |
+ | *Find out what Tobias Randall knows about the murder. (Prerequisite: T Randall decoded; New Crime Scene Unlocked: Zoe's Room) |
| − | *Investigate Zoe's Room. (Prerequisite: Tobias interrogated; Clues: Torn |
+ | *Investigate Zoe's Room. (Prerequisite: Tobias interrogated; Clues: Torn Paper, Pocket Watch) |
| − | *Examine Torn |
+ | *Examine Torn Paper. (Result: Drawing; New Suspect: Kai Gruber) |
*Ask Kai if he knew Zoe. (Prerequisite: Drawing restored) |
*Ask Kai if he knew Zoe. (Prerequisite: Drawing restored) |
||
*Examine Pocket Watch. (Result: Unknown Monogram) |
*Examine Pocket Watch. (Result: Unknown Monogram) |
||
| Line 136: | Line 138: | ||
*Autopsy Victim's Body again. (18:00:00) |
*Autopsy Victim's Body again. (18:00:00) |
||
*Have Jasper review Zoe's autopsy report. (Prerequisite: Victim's Body autopsied) |
*Have Jasper review Zoe's autopsy report. (Prerequisite: Victim's Body autopsied) |
||
| − | * |
+ | *Move on to a [[Playing Dead|new crime]]! (1 star) |
==Trivia== |
==Trivia== |
||
| Line 142: | Line 144: | ||
*This is one of the cases in which the player has to investigate the same crime scene twice during the main leg. |
*This is one of the cases in which the player has to investigate the same crime scene twice during the main leg. |
||
*This is one of the cases in which the killer has to be interrogated once again during the [[Additional Investigation]]. |
*This is one of the cases in which the killer has to be interrogated once again during the [[Additional Investigation]]. |
||
| + | *This case, along with [[Hell Is Other People]] and [[Blaze of Glory]], is one of only three cases in The Conspiracy where Martine conducts more than one autopsy task. |
||
| − | *This is the only case where a clue needs to be analyzed multiple times (in this case, Zoe's body is autopsied twice). |
||
| + | *This case is one of only three cases in the game where the same body is autopsied twice, with the others being [[Operation Spyfall]] and [[Niagara Fallen]]. |
||
| + | *This case contains two references to case [[Doctor, Interrupted]] from [[Mysteries of the Past]]: |
||
| + | **When examining Zoe's belongings from the "Board Game Area" crime scene, several copies of ''Shock Therapy'', a book written by [[Irving Blackmoor]], who was the victim in the case, can be found. |
||
| + | **When examining the hospital visitors' logbook from the "Common Room" crime scene, a patient named Wayne Reed can be found. This is a reference to [[Dwayne Reed]], who was also a patient and the killer in the case. |
||
*In the "Common Room" crime scene: |
*In the "Common Room" crime scene: |
||
**[[Rachel Priest]] can be seen on a TV screen. |
**[[Rachel Priest]] can be seen on a TV screen. |
||
**When examining the trash can, several pieces of paper with a quote of [[Wikipedia:Abraham Lincoln|Abraham Lincoln]] can be spotted. |
**When examining the trash can, several pieces of paper with a quote of [[Wikipedia:Abraham Lincoln|Abraham Lincoln]] can be spotted. |
||
| + | *''Two Flew Over the Eagle's Nest'' is a parody of ''[[Wikipedia:One Flew Over the Cuckoo's Nest (novel)|One Flew Over the Cuckoo's Nest]]''. |
||
| + | *Ben Lacey is a parody of [[Wikipedia:Ken Kesey|Ken Kesey]]. |
||
==Navigation== |
==Navigation== |
||
Latest revision as of 05:39, 18 March 2020
| ◄ | General | ► |
Head Case is a case featured in Criminal Case as the fifty-second case of The Conspiracy (Season 5) and the two-hundred eighty-third case overall. It takes place in the Airport district of Grimsborough.
Plot
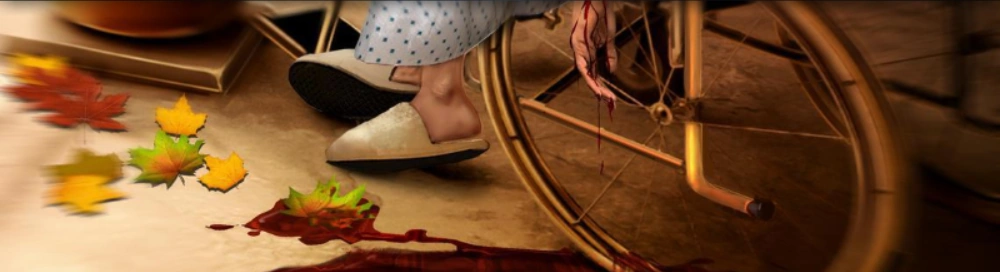
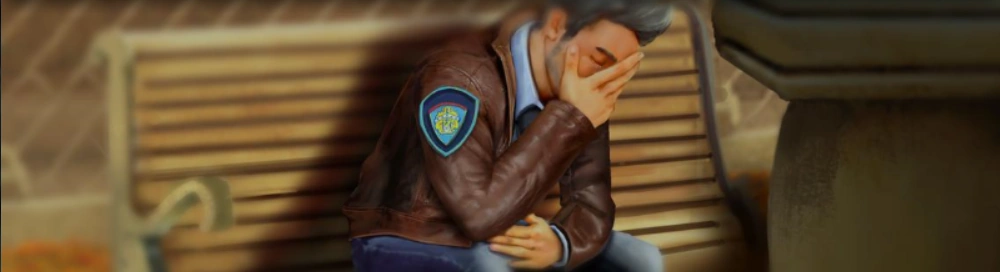
Jones, Gabriel, and the player went to Grimsborough Psychiatric Hospital to talk to Zoe Kusama regarding the human experiments under DreamLife's dome, only to find her dead with her head bashed in the hospital courtyard. With Jones emotionally unable to continue the investigation, Gabriel took care of him while Gloria took over as the player’s partner.
Mid-investigation, the team (along with orderly Tobias Randall) calmed down a group of distressed patients who had learned of Zoe's death. Later, a grieving Jones told the team that he was going to murder Zoe's killer before breaking down into tears again, causing Gabriel to lead him back to his office. The team would then find enough clues to arrest news reporter Louis Leroux for the murder.
Upon admitting to the murder, Louis explained that he had caught Zoe telekinetically levitating a teacup when he showed up in Zoe's room unannounced. Connecting her abilities to her time under the dome and realizing it was his duty to uncover the whole truth, Louis then asked to examine the extent of her condition. Zoe, freaking out at the prospect of more tests performed upon her, started screaming. In a panic over getting kicked out, Louis grabbed a fence post and smashed her head in to keep her quiet. Judge Powell sentenced an apologetic Louis to life in prison. Post-trial, the team rushed Jones to the hospital after he had attempted suicide via overdose on sedatives.
Gabriel and the player went to the hospital common room and found a bottle of flumazenil, which Amir used to synthesize an antidote to the sedatives in Jones' system. After talking to a now-conscious Jones and to Dr Jennifer Russo for advice, the team went back to Zoe's room and found the letters Zoe had written to Jones as part of her therapy. The team then showed the letters to Jones and convinced him that Zoe would have wanted him to be happy, giving Jones back the will to fight for his life.
Meanwhile, Louis told Gloria and the player that he had installed a hidden camera in Zoe's room to record her telekinesis. The team found the camera which contained a recording of Zoe moving a teacup hands-free, corroborating Louis' claims. Chief Parker then authorized Martine to autopsy Zoe once again, whereupon she found that Zoe's occipital lobe was exposed to a different Berzelium derivative than Protozane, confirming her exposure to the superhuman serum. Jasper Everett then told the team that the telekinesis was merely a side effect of the drug.
After all the events, the team decided to go to the TV station to look further into Louis' findings.
Summary
Victim
- Zoe Kusama (found in the hospital courtyard with her head bashed in)
Murder Weapon
- Fence Post
Killer
- Louis Leroux
Suspects
")
")
")
")
")
Quasi-suspect(s)
")
")
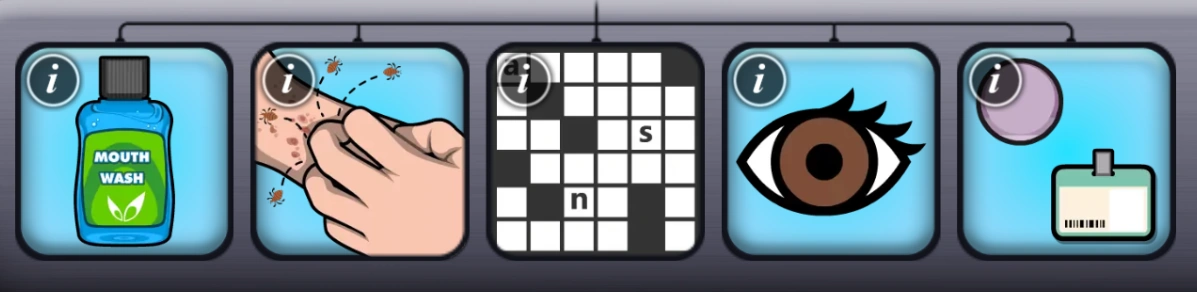
Killer's Profile
- The killer uses mouthwash.
- The killer has a dust mite allergy.
- The killer does crosswords.
- The killer has brown eyes.
- The killer wears a badge.
Crime Scenes
")
")
")
")
")
")
Steps
Chapter 1
- Investigate Hospital Courtyard. (Clue: Zoe's Body; Victim identified: Zoe Kusama)
- Investigate Hospital Courtyard again. (Prerequisite: Hospital Courtyard investigated; Clues: Set of Keys, Gardening Equipment)
- Examine Set of Keys. (New Suspect: Tobias Randall)
- Find out what Tobias Randall knows about the murder. (Prerequisite: T Randall decoded; New Crime Scene Unlocked: Zoe's Room)
- Investigate Zoe's Room. (Prerequisite: Tobias interrogated; Clues: Torn Paper, Pocket Watch)
- Examine Torn Paper. (Result: Drawing; New Suspect: Kai Gruber)
- Ask Kai if he knew Zoe. (Prerequisite: Drawing restored)
- Examine Pocket Watch. (Result: Unknown Monogram)
- Examine Unknown Monogram. (Result: Jennifer Russo's Monogram; New Suspect: Dr Jennifer Russo)
- Ask Dr Russo whether she treated Zoe. (Prerequisite: Jennifer Russo's Monogram identified)
- Examine Gardening Equipment. (Result: Zoe’s Earring)
- Analyze Zoe’s Earring. (03:00:00; Attribute: The killer has a dust mite allergy)
- Autopsy Victim's Body. (18:00:00; Attribute: The killer uses mouthwash)
- Go to Chapter 2. (No stars)
Chapter 2
- Investigate Common Room. (Available after unlocking Chapter 2; Clues: Trash Bin, Visitor's Logbook)
- Examine Trash Bin. (Result: Blood-Stained List)
- Analyze Blood-Stained List. (12:00:00; Attribute: The killer does crosswords; New Crime Scene Unlocked: Zoe's Desk)
- Investigate Zoe's Desk. (Prerequisite: Blood-Stained List analyzed; Clues: Locked Tablet, Mirror [Message on Mirror])
- Examine Locked Tablet. (Result: Unlocked Tablet)
- Ask Dr Russo why she lied about Zoe's treatment. (Prerequisite: Tablet unlocked; Profile updated: Jennifer uses mouthwash, has a dust mite allergy and does crosswords)
- Examine Message on Mirror. (Result: Blue Substance)
- Analyze Blue Substance. (09:00:00)
- Confront Tobias Randall about vandalizing Zoe's mirror. (Prerequisite: Blue Substance analyzed; Profile updated: Tobias uses mouthwash; New Suspect: Rosamund Wilcox)
- Ask Rosamund Wilcox if she was friends with Zoe. (Prerequisite: Tobias interrogated)
- Examine Visitor's Logbook. (Result: Visitors' Names; New Suspect: Louis Leroux)
- Inform Louis Leroux of Zoe's death. (Prerequisite: Visitors' Names unraveled; Profile updated: Louis uses mouthwash)
- Go to Chapter 3. (1 star)
Chapter 3
- Investigate Board Game Area. (Available after unlocking Chapter 3; Clues: Zoe's Belongings, Domino Board, Security Camera)
- Examine Zoe's Belongings. (Result: Zoe's Diary)
- Analyze Zoe's Diary. (09:00:00)
- Find out why Zoe didn't want to see Louis Leroux anymore. (Prerequisite: Zoe's Diary analyzed; Profile updated: Louis has a dust mite allergy and does crosswords)
- Examine Security Camera. (Result: Unlocked Camera)
- Ask Kai Gruber why he threatened Zoe. (Prerequisite: Security Camera unlocked; Profile updated: Kai uses mouthwash, has a dust mite allergy and does crosswords)
- Examine Domino Board. (Result: Brown Substance)
- Examine Brown Substance. (Result: Decaf Coffee)
- Confront Rosamund Wilcox about her threat to Zoe. (Prerequisite: Decaf Coffee identified under microscope; Profile updated: Rosamund does crosswords)
- Investigate Courtyard Statue. (All tasks before must be done first; Clues: Crossword Book, Garden Shed)
- Examine Crossword Book. (Result: Dirt)
- Analyze Dirt. (09:00:00; Attribute: The killer has a badge)
- Examine Garden Shed. (Result: Blood-Stained Fence Post)
- Analyze Blood-Stained Fence Post. (15:00:00; Murder Weapon registered: Fence Post; Attribute: The killer has brown eyes)
- Take care of the killer now!
- Go to To the Stars (4/6). (No stars)
To the Stars (4/6)

- Investigate Common Room. (Available after unlocking To the Stars; Clue: Medicine Bottle)
- Examine Medicine Bottle. (Result: Label [Medicine Bottle])
- Analyze Medicine Bottle. (03:00:00)
- Check on Jones' condition. (Prerequisite: Medicine Bottle analyzed)
- Ask Dr Russo for advice to help Jones. (Prerequisite: Jones interrogated; Reward: Burger)
- Investigate Zoe's Room. (Prerequisite: Jennifer interrogated; Clue: Torn Letter)
- Examine Torn Letter. (Result: Zoe's Letter)
- Show Zoe's letter to Jones. (Prerequisite: Zoe's Letter restored; Reward: 20,000 Coins)
- Talk to Leroux about Zoe's alleged powers. (Available after unlocking To the Stars; Reward: Microphone Necklace)
- Investigate Zoe's Desk. (Prerequisite: Louis interrogated; Clue: Framed Photo [Camera Keypad])
- Examine Camera Keypad. (Result: Picture Frame Camera)
- Autopsy Victim's Body again. (18:00:00)
- Have Jasper review Zoe's autopsy report. (Prerequisite: Victim's Body autopsied)
- Move on to a new crime! (1 star)
Trivia
- The case title comes from the phrase "head case" used to describe a mentally ill or unstable person. It also references how Zoe died of blunt force trauma.
- This is one of the cases in which the player has to investigate the same crime scene twice during the main leg.
- This is one of the cases in which the killer has to be interrogated once again during the Additional Investigation.
- This case, along with Hell Is Other People and Blaze of Glory, is one of only three cases in The Conspiracy where Martine conducts more than one autopsy task.
- This case is one of only three cases in the game where the same body is autopsied twice, with the others being Operation Spyfall and Niagara Fallen.
- This case contains two references to case Doctor, Interrupted from Mysteries of the Past:
- When examining Zoe's belongings from the "Board Game Area" crime scene, several copies of Shock Therapy, a book written by Irving Blackmoor, who was the victim in the case, can be found.
- When examining the hospital visitors' logbook from the "Common Room" crime scene, a patient named Wayne Reed can be found. This is a reference to Dwayne Reed, who was also a patient and the killer in the case.
- In the "Common Room" crime scene:
- Rachel Priest can be seen on a TV screen.
- When examining the trash can, several pieces of paper with a quote of Abraham Lincoln can be spotted.
- Two Flew Over the Eagle's Nest is a parody of One Flew Over the Cuckoo's Nest.
- Ben Lacey is a parody of Ken Kesey.