No edit summary Tags: rollback rte-source |
No edit summary |
||
| (20 intermediate revisions by 13 users not shown) | |||
| Line 1: | Line 1: | ||
{{CaseNav}} |
{{CaseNav}} |
||
| + | {{CaseInfobox |
||
| − | {{WECaseInfobox |
||
|name = Bad Medicine |
|name = Bad Medicine |
||
|image = C134Summary.png |
|image = C134Summary.png |
||
| Line 8: | Line 8: | ||
|location = [[wikipedia:Agra|Agra]], [[wikipedia:India|India]]<br \>[[wikipedia:New Delhi|New Delhi]], [[Wikipedia:India|India]] |
|location = [[wikipedia:Agra|Agra]], [[wikipedia:India|India]]<br \>[[wikipedia:New Delhi|New Delhi]], [[Wikipedia:India|India]] |
||
|datereleased = 4th February 2016 |
|datereleased = 4th February 2016 |
||
| − | |partner = [[Carmen Martinez]] (Chapter 1, Chapter 3 & [[Additional Investigation|A New Light 1]])<br |
+ | |partner = [[Carmen Martinez]] (Chapter 1, Chapter 3 & [[Additional Investigation|A New Light 1]])<br />[[Jack Archer]] (Chapter 2)<br />[[Lars Douglas]] (A New Light 1) |
|preceededby = [[Countdown to Murder]]<br /><small>(in [[:Category:Eurasia|Eurasia]])</small> |
|preceededby = [[Countdown to Murder]]<br /><small>(in [[:Category:Eurasia|Eurasia]])</small> |
||
|succeededby = [[Treacherous Waters]] |
|succeededby = [[Treacherous Waters]] |
||
}} |
}} |
||
| − | '''Bad Medicine''' is a [[Cases|case]] featured in ''[[Criminal Case]]'' as the one-hundred and thirty-fourth case of the game. It is the nineteenth case of the game's [[World Edition]] (Season 3) and |
+ | '''Bad Medicine''' is a [[Cases|case]] featured in ''[[Criminal Case]]'' as the one-hundred and thirty-fourth case of the game. It is the nineteenth case of the game's [[World Edition]] (Season 3) and the first to take place in [[:Category:South Asia|South Asia]]. |
==Plot== |
==Plot== |
||
| − | [[Chief Ripley]] said that [[SOMBRA]] |
+ | [[Elizabeth Ripley|Chief Ripley]] said that [[SOMBRA]] had gone dormant after the events of the [[Countdown to Murder|last case]]. She said that they would go to New Delhi in India where they would provide aid to the victims of a major earthquake. [[Carmen Martinez|Carmen]] went with the player to the Taj Mahal so they could help Rising Hope, a non-government relief organization. Near the Taj Mahal, the cops found aid worker [[Donna Sandover]], seemingly poisoned. |
| − | Mid-investigation, Carmen was hit in the head with a drawer because an aftershock hit [[The Bureau|the Bureau]]'s headquarters. She was sent to an improvised hospital while [[Jack Archer|Jack]] replaced her. Carmen went back to work after she stopped a riot of patients demanding for medicine. |
+ | Mid-investigation, Carmen was hit in the head with a drawer because an aftershock hit [[The Bureau|the Bureau]]'s headquarters. She was then sent to an improvised hospital while [[Jack Archer|Jack]] replaced her. Carmen went back to work after she stopped a riot of patients demanding for medicine. |
The cops gathered enough [[Killer's Profile|evidence]] to incriminate [[Dr Sumati Misra]] for the murder. Initially denying involvement in the murder, Dr Misra admitted that she killed Donna. Dr Misra was annoyed at Rising Hope telling her what to do. When Donna broke into her office, stole medicine for the victims, and threatened to report her for charging for complimentary treatment, Dr Misra was pushed to the limit. She then slipped an excessive dose of morphine in Donna's water bottle and waited for her death. [[Nigel Adaku|Judge Adaku]] issued Dr Misra a 25-year jail sentence for murder and for charging earthquake victims for medicine. |
The cops gathered enough [[Killer's Profile|evidence]] to incriminate [[Dr Sumati Misra]] for the murder. Initially denying involvement in the murder, Dr Misra admitted that she killed Donna. Dr Misra was annoyed at Rising Hope telling her what to do. When Donna broke into her office, stole medicine for the victims, and threatened to report her for charging for complimentary treatment, Dr Misra was pushed to the limit. She then slipped an excessive dose of morphine in Donna's water bottle and waited for her death. [[Nigel Adaku|Judge Adaku]] issued Dr Misra a 25-year jail sentence for murder and for charging earthquake victims for medicine. |
||
| + | [[File:O.M.MediLab.png|thumb|150px|O.M. MediLab.]] |
||
| − | Post-trial, Carmen and the player found a bottle of Dracoxia pills manufactured by O.M. MediLab near the Taj Mahal. [[Elliot Clayton|Elliot]] and [[Angela Douglas|Angela]] confirmed that Dracoxia was an experimental medicine that could attack various viruses. Because of its efficiency, widespread and excess use would create a supervirus immune to all known medicine. Elliot also said that O.M. MediLab lacked transparency in its financial transactions. Because only Dr Misra was authorized to distribute it, she was interrogated. She said that O.M. MediLab promised her access to their pharmaceutical catalog in exchange for updates on how patients reacted to Dracoxia. She also told the cops to find the last lot of medicine in the Lotus Temple. |
+ | Post-trial, Carmen and the player found a bottle of Dracoxia pills manufactured by O.M. MediLab near the Taj Mahal. [[Elliot Clayton|Elliot]] and [[Angela Douglas|Angela]] confirmed that Dracoxia was an experimental medicine that could attack various viruses. Because of its efficiency, widespread and excess use would create a supervirus immune to all known medicine. Elliot also said that O.M. MediLab lacked transparency in its financial transactions. Because only Dr Misra was authorized to distribute it, she was then interrogated. She said that O.M. MediLab promised her access to their pharmaceutical catalog in exchange for updates on how patients reacted to Dracoxia. She also told the cops to find the last lot of medicine in the Lotus Temple. |
In the temple, they only found an invoice that revealed Rising Hope selling a huge lot of medicine to O.M. MediLab. [[Warren Goodfellow]], Donna's supervisor, said that the NGO had stored medicine they were not allowed to distribute. To gather funds for the NGO, Warren sold the medicine. |
In the temple, they only found an invoice that revealed Rising Hope selling a huge lot of medicine to O.M. MediLab. [[Warren Goodfellow]], Donna's supervisor, said that the NGO had stored medicine they were not allowed to distribute. To gather funds for the NGO, Warren sold the medicine. |
||
| Line 29: | Line 30: | ||
At the end of the case, Chief Ripley sent Carmen and the player [[Treacherous Waters|to Mumbai]] because aftershocks were causing tsunamis there. |
At the end of the case, Chief Ripley sent Carmen and the player [[Treacherous Waters|to Mumbai]] because aftershocks were causing tsunamis there. |
||
| − | == |
+ | ==Summary== |
===[[:Category:Victims|Victim]]=== |
===[[:Category:Victims|Victim]]=== |
||
*'''Donna Sandover''' (found dead at the earthquake site) |
*'''Donna Sandover''' (found dead at the earthquake site) |
||
| Line 69: | Line 70: | ||
===Chapter 1=== |
===Chapter 1=== |
||
[[File:C134C1.png|506x146px|border]] |
[[File:C134C1.png|506x146px|border]] |
||
| − | * |
+ | *Investigate Earthquake Site. ([[Evidence|Clues]]: Victim’s Body, Torn Photo, Locked Cellphone; Victim identified: Donna Sandover) |
| − | * |
+ | *Examine Torn Photo. (Result: Victim’s Selfie; New Suspect: Sanjay Korrapati) |
| − | * |
+ | *Question Sanjay Korrapati about his photo with the victim. (Prerequisite: Victim’s Selfie restored; New Crime Scene Unlocked: Toppled Statue) |
| − | * |
+ | *Investigate Toppled Statue. (Prerequisite: Sanjay interrogated; Clues: Faded Book, Victim’s Wallet) |
| − | * |
+ | *Examine Faded Book. (Result: Indian Text) |
| − | * |
+ | *Analyze Indian Text. (03:00:00; Attribute: The killer knows the ''Bhagavad Gita'') |
| − | * |
+ | *Examine Victim’s Wallet. (Result: Unknown Logo) |
| − | * |
+ | *Examine Unknown Logo. (Result: Bodhi’s Logo; New Suspect: Bodhi Green) |
| − | * |
+ | *Ask Bodhi Green about his business card. (Prerequisite: Bodhi’s Logo identified) |
| − | * |
+ | *Examine Locked Cellphone. (Result: Victim’s Cellphone; New Suspect: Warren Goodfellow) |
| − | * |
+ | *Ask Warren Goodfellow about the phone calls from the victim. (Prerequisite: Victim’s Cellphone unlocked) |
| − | * |
+ | *Autopsy Victim's Body. (18:00:00; Murder Weapon registered: Morphine; Attribute: The killer drinks chai tea) |
| − | * |
+ | *Go to Chapter 2. (No [[Stars|stars]]) |
===Chapter 2=== |
===Chapter 2=== |
||
[[File:C134C2.png|506x146px|border]] |
[[File:C134C2.png|506x146px|border]] |
||
| − | * |
+ | *Investigate Makeshift Hospital. (Available after unlocking Chapter 2; Clues: Biohazard Waste Can, Locked Tablet, Faded Newspaper) |
| − | * |
+ | *Examine Biohazard Waste Can. (Result: Water Bottle) |
| − | * |
+ | *Analyze Water Bottle. (06:00:00; Attribute: The killer eats papadums) |
| − | * |
+ | *Examine Locked Tablet. (Result: Unlocked Tablet) |
| − | * |
+ | *Analyze Unlocked Tablet. (12:00:00; New Suspect: Arsha Raju; New Crime Scene Unlocked: Disaster Zone) |
| − | * |
+ | *Question Arsha Raju about her Goodwill appearances. (Prerequisite: Unlocked Tablet analyzed; Profile updated: Arsha drinks chai tea) |
| − | * |
+ | *Investigate Disaster Zone. (Prerequisite: Unlocked Tablet analyzed; Clues: Broken Object, Stained Tapestry) |
| − | * |
+ | *Examine Broken Object. (Result: Magnet) |
| − | * |
+ | *Ask Sanjay about the message on his magnet. (Prerequisite: Magnet restored; Profile updated: Sanjay drinks chai tea and knows the ''Bhagavad Gita'') |
| − | * |
+ | *Examine Stained Tapestry. (Result: Brown Liquid) |
| − | * |
+ | *Examine Brown Liquid. (Result: Bodhi’s DNA; Profile updated: Bodhi drinks chai tea) |
| − | * |
+ | *Question Bodhi about the message he sent to the victim. (Prerequisite: Bodhi’s DNA identified; Profile updated: Bodhi knows the ''Bhagavad Gita'') |
| − | * |
+ | *Examine Faded Newspaper (Result: Newspaper Headline; New Suspect: Dr Sumati Misra) |
| − | * |
+ | *Question Dr Sumati Misra about her relief work with the victim. (Prerequisite: Newspaper Headline unraveled; Profile updated: Sumati drinks chai tea and knows the ''Bhagavad Gita'') |
| − | * |
+ | *Go to Chapter 3. (1 star) |
===Chapter 3=== |
===Chapter 3=== |
||
[[File:C134C3.png|506x146px|border]] |
[[File:C134C3.png|506x146px|border]] |
||
| − | * |
+ | *Investigate Hospital Beds. (Available after unlocking Chapter 3; Clues: Locked Camera, Plate of Samosas, Victim’s Satchel) |
| − | * |
+ | *Examine Locked Camera. (Result: News Camera) |
| − | * |
+ | *Ask Arsha about the victim’s attack during her Goodwill speech. (Prerequisite: News Camera unlocked; Profile updated: Arsha knows the ''Bhagavad Gita'') |
| − | * |
+ | *Examine Plate of Samosas. (Result: Note to Dr Misra) |
| − | * |
+ | *Talk to Dr Misra about the note left by her patients. (Prerequisite: Note to Dr Misra unraveled; Profile updated: Sumati eats papadums) |
| − | * |
+ | *Examine Victim’s Satchel. (Result: Magnetic Card) |
| − | * |
+ | *Analyze Magnetic Card. (09:00:00) |
| − | * |
+ | *Question Warren about his stolen security pass. (Prerequisite: Magnetic Card analyzed; Profiles updated: Warren drinks chai tea, knows the ''Bhagavad Gita'', and eats papadums, Sanjay eats papadums) |
| − | * |
+ | *Investigate Destroyed Fountain. (All tasks before must be done first; Clues: Walkie-Talkie, Emergency Blanket) |
| − | * |
+ | *Examine Walkie-Talkie. (Result: Clear Liquid) |
| − | * |
+ | *Analyze Clear Liquid. (15:00:00; Attribute: The killer wears glasses) |
| − | * |
+ | *Examine Emergency Blanket. (Result: Carved Beads) |
| − | * |
+ | *Analyze Carved Beads. (09:00:00; Attribute: The killer wears prayer beads) |
| − | * |
+ | *Take care of the killer now! |
| − | * |
+ | *Go to [[Additional Investigation|A New Light (1/6)]] (No stars) |
===A New Light (1/6)=== |
===A New Light (1/6)=== |
||
[[File:C134C4.png|506x146px|border]] |
[[File:C134C4.png|506x146px|border]] |
||
| − | * |
+ | *Investigate Earthquake Site. (Available after unlocking A New Light; Clue: Broken Object) |
| − | * |
+ | *Examine Broken Object. (Result: Pill Box) |
| − | * |
+ | *Examine Pill Box. (Result: Bottle Label) |
| − | * |
+ | *Analyze Bottle Label. (09:00:00) |
| − | * |
+ | *Question Dr Misra about the pill bottle. (Prerequisite: Bottle Label analyzed; Reward: '''[[Snacks|Burger]]''') |
| − | * |
+ | *Investigate Makeshift Hospital. (Prerequisite: Sumati interrogated; Clue: Faded Paper) |
| − | * |
+ | *Examine Faded Paper. (Result: Shipment Invoice) |
| − | * |
+ | *Question Warren about the shipping invoice. (Prerequisite: Shipment Invoice unraveled; Reward: '''20,000 [[Coins]]''') |
| − | * |
+ | *Investigate Toppled Statue. (Available after unlocking A New Light; Clue: Yoga Bag) |
| − | * |
+ | *Examine Yoga Bag. (Result: Locked Camera) |
| − | * |
+ | *Examine Locked Camera. (Result: Video Camera) |
| − | * |
+ | *Analyze Video Camera. (06:00:00) |
| − | * |
+ | *Ask Bodhi about the guru in the video. (Prerequisite: Video Camera analyzed; Reward: '''Charm Necklace''') |
| − | * |
+ | *Move on to a [[Treacherous Waters|new crime]]! (No stars) |
==Trivia== |
==Trivia== |
||
| Line 140: | Line 141: | ||
*This case is one of the cases in which the killer has to be interrogated once again during the Additional Investigation. |
*This case is one of the cases in which the killer has to be interrogated once again during the Additional Investigation. |
||
*This is one of the cases in which Carmen and Jack interact with each other. |
*This is one of the cases in which Carmen and Jack interact with each other. |
||
| + | *In the "Earthquake Site" crime scene, you can spot a portrait of Indian leader [[Wikipedia:Mahatma Gandhi|Mahatma Gandhi]]. |
||
| + | *The "Rising Hope", mentioned several times in this case, may be a parody of [[Wikipedia:International Red Cross and Red Crescent Movement|International Red Cross]]. |
||
==Navigation== |
==Navigation== |
||
{{Cases in World Edition}} |
{{Cases in World Edition}} |
||
[[Category:Cases]] |
[[Category:Cases]] |
||
| − | [[Category:Cases |
+ | [[Category:Cases in World Edition]] |
[[Category:South Asia]] |
[[Category:South Asia]] |
||
Revision as of 15:28, 10 January 2019
| ◄ | General | ► |
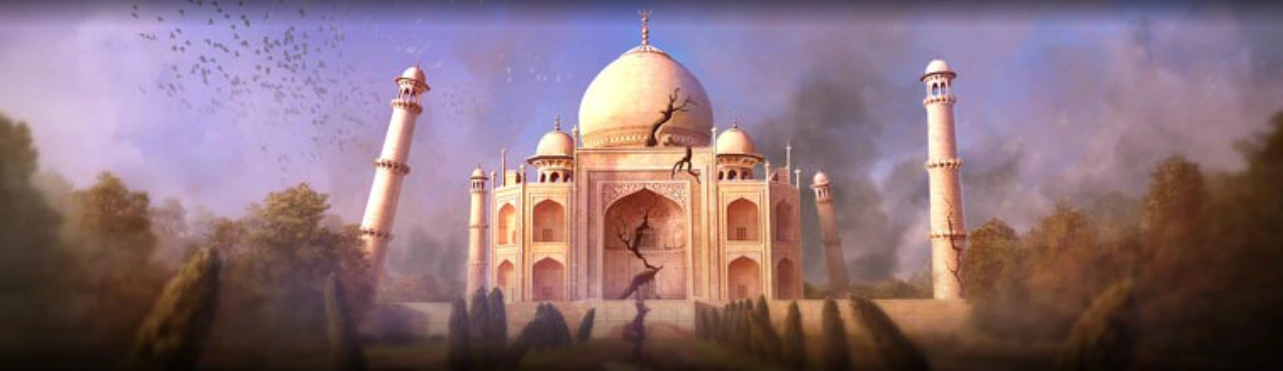
Bad Medicine is a case featured in Criminal Case as the one-hundred and thirty-fourth case of the game. It is the nineteenth case of the game's World Edition (Season 3) and the first to take place in South Asia.
Plot
Chief Ripley said that SOMBRA had gone dormant after the events of the last case. She said that they would go to New Delhi in India where they would provide aid to the victims of a major earthquake. Carmen went with the player to the Taj Mahal so they could help Rising Hope, a non-government relief organization. Near the Taj Mahal, the cops found aid worker Donna Sandover, seemingly poisoned.
Mid-investigation, Carmen was hit in the head with a drawer because an aftershock hit the Bureau's headquarters. She was then sent to an improvised hospital while Jack replaced her. Carmen went back to work after she stopped a riot of patients demanding for medicine.
The cops gathered enough evidence to incriminate Dr Sumati Misra for the murder. Initially denying involvement in the murder, Dr Misra admitted that she killed Donna. Dr Misra was annoyed at Rising Hope telling her what to do. When Donna broke into her office, stole medicine for the victims, and threatened to report her for charging for complimentary treatment, Dr Misra was pushed to the limit. She then slipped an excessive dose of morphine in Donna's water bottle and waited for her death. Judge Adaku issued Dr Misra a 25-year jail sentence for murder and for charging earthquake victims for medicine.


O.M. MediLab.
Post-trial, Carmen and the player found a bottle of Dracoxia pills manufactured by O.M. MediLab near the Taj Mahal. Elliot and Angela confirmed that Dracoxia was an experimental medicine that could attack various viruses. Because of its efficiency, widespread and excess use would create a supervirus immune to all known medicine. Elliot also said that O.M. MediLab lacked transparency in its financial transactions. Because only Dr Misra was authorized to distribute it, she was then interrogated. She said that O.M. MediLab promised her access to their pharmaceutical catalog in exchange for updates on how patients reacted to Dracoxia. She also told the cops to find the last lot of medicine in the Lotus Temple.
In the temple, they only found an invoice that revealed Rising Hope selling a huge lot of medicine to O.M. MediLab. Warren Goodfellow, Donna's supervisor, said that the NGO had stored medicine they were not allowed to distribute. To gather funds for the NGO, Warren sold the medicine.
Also after the trial, Lars and the player found a camera near the Hanuman Statue. Elliot revealed that Bodhi Green had many meetings with a sect led by a Guru Padmasana. Bodhi only told the cops that the guru was the light in a world of darkness and people were purified by his light. Furthermore, he was going to lead a spiritual gathering in Mumbai.
At the end of the case, Chief Ripley sent Carmen and the player to Mumbai because aftershocks were causing tsunamis there.
Summary
Victim
- Donna Sandover (found dead at the earthquake site)
Murder Weapon
- Morphine
Killer
- Dr Sumati Misra
Suspects
")
")
")
")
")
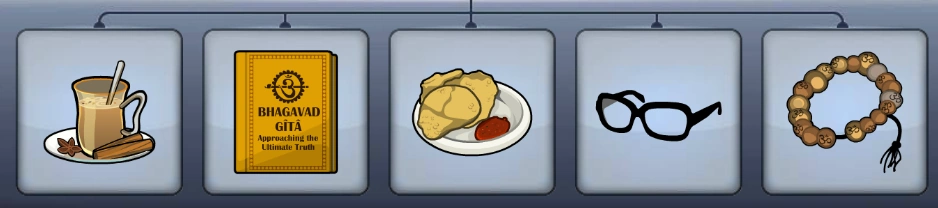
Killer's Profile
- The killer drinks chai tea.
- The killer knows the Bhagavad Gita.
- The killer eats papadums.
- The killer wears glasses.
- The killer wears prayer beads.
Crime Scenes
")
")
")
")
")
")
Steps
Chapter 1
- Investigate Earthquake Site. (Clues: Victim’s Body, Torn Photo, Locked Cellphone; Victim identified: Donna Sandover)
- Examine Torn Photo. (Result: Victim’s Selfie; New Suspect: Sanjay Korrapati)
- Question Sanjay Korrapati about his photo with the victim. (Prerequisite: Victim’s Selfie restored; New Crime Scene Unlocked: Toppled Statue)
- Investigate Toppled Statue. (Prerequisite: Sanjay interrogated; Clues: Faded Book, Victim’s Wallet)
- Examine Faded Book. (Result: Indian Text)
- Analyze Indian Text. (03:00:00; Attribute: The killer knows the Bhagavad Gita)
- Examine Victim’s Wallet. (Result: Unknown Logo)
- Examine Unknown Logo. (Result: Bodhi’s Logo; New Suspect: Bodhi Green)
- Ask Bodhi Green about his business card. (Prerequisite: Bodhi’s Logo identified)
- Examine Locked Cellphone. (Result: Victim’s Cellphone; New Suspect: Warren Goodfellow)
- Ask Warren Goodfellow about the phone calls from the victim. (Prerequisite: Victim’s Cellphone unlocked)
- Autopsy Victim's Body. (18:00:00; Murder Weapon registered: Morphine; Attribute: The killer drinks chai tea)
- Go to Chapter 2. (No stars)
Chapter 2
- Investigate Makeshift Hospital. (Available after unlocking Chapter 2; Clues: Biohazard Waste Can, Locked Tablet, Faded Newspaper)
- Examine Biohazard Waste Can. (Result: Water Bottle)
- Analyze Water Bottle. (06:00:00; Attribute: The killer eats papadums)
- Examine Locked Tablet. (Result: Unlocked Tablet)
- Analyze Unlocked Tablet. (12:00:00; New Suspect: Arsha Raju; New Crime Scene Unlocked: Disaster Zone)
- Question Arsha Raju about her Goodwill appearances. (Prerequisite: Unlocked Tablet analyzed; Profile updated: Arsha drinks chai tea)
- Investigate Disaster Zone. (Prerequisite: Unlocked Tablet analyzed; Clues: Broken Object, Stained Tapestry)
- Examine Broken Object. (Result: Magnet)
- Ask Sanjay about the message on his magnet. (Prerequisite: Magnet restored; Profile updated: Sanjay drinks chai tea and knows the Bhagavad Gita)
- Examine Stained Tapestry. (Result: Brown Liquid)
- Examine Brown Liquid. (Result: Bodhi’s DNA; Profile updated: Bodhi drinks chai tea)
- Question Bodhi about the message he sent to the victim. (Prerequisite: Bodhi’s DNA identified; Profile updated: Bodhi knows the Bhagavad Gita)
- Examine Faded Newspaper (Result: Newspaper Headline; New Suspect: Dr Sumati Misra)
- Question Dr Sumati Misra about her relief work with the victim. (Prerequisite: Newspaper Headline unraveled; Profile updated: Sumati drinks chai tea and knows the Bhagavad Gita)
- Go to Chapter 3. (1 star)
Chapter 3

- Investigate Hospital Beds. (Available after unlocking Chapter 3; Clues: Locked Camera, Plate of Samosas, Victim’s Satchel)
- Examine Locked Camera. (Result: News Camera)
- Ask Arsha about the victim’s attack during her Goodwill speech. (Prerequisite: News Camera unlocked; Profile updated: Arsha knows the Bhagavad Gita)
- Examine Plate of Samosas. (Result: Note to Dr Misra)
- Talk to Dr Misra about the note left by her patients. (Prerequisite: Note to Dr Misra unraveled; Profile updated: Sumati eats papadums)
- Examine Victim’s Satchel. (Result: Magnetic Card)
- Analyze Magnetic Card. (09:00:00)
- Question Warren about his stolen security pass. (Prerequisite: Magnetic Card analyzed; Profiles updated: Warren drinks chai tea, knows the Bhagavad Gita, and eats papadums, Sanjay eats papadums)
- Investigate Destroyed Fountain. (All tasks before must be done first; Clues: Walkie-Talkie, Emergency Blanket)
- Examine Walkie-Talkie. (Result: Clear Liquid)
- Analyze Clear Liquid. (15:00:00; Attribute: The killer wears glasses)
- Examine Emergency Blanket. (Result: Carved Beads)
- Analyze Carved Beads. (09:00:00; Attribute: The killer wears prayer beads)
- Take care of the killer now!
- Go to A New Light (1/6) (No stars)
A New Light (1/6)
- Investigate Earthquake Site. (Available after unlocking A New Light; Clue: Broken Object)
- Examine Broken Object. (Result: Pill Box)
- Examine Pill Box. (Result: Bottle Label)
- Analyze Bottle Label. (09:00:00)
- Question Dr Misra about the pill bottle. (Prerequisite: Bottle Label analyzed; Reward: Burger)
- Investigate Makeshift Hospital. (Prerequisite: Sumati interrogated; Clue: Faded Paper)
- Examine Faded Paper. (Result: Shipment Invoice)
- Question Warren about the shipping invoice. (Prerequisite: Shipment Invoice unraveled; Reward: 20,000 Coins)
- Investigate Toppled Statue. (Available after unlocking A New Light; Clue: Yoga Bag)
- Examine Yoga Bag. (Result: Locked Camera)
- Examine Locked Camera. (Result: Video Camera)
- Analyze Video Camera. (06:00:00)
- Ask Bodhi about the guru in the video. (Prerequisite: Video Camera analyzed; Reward: Charm Necklace)
- Move on to a new crime! (No stars)
Trivia
- The name of the case was taken from Bon Jovi's popular single, "Bad Medicine".
- This case is one of the cases in which the killer has to be interrogated once again during the Additional Investigation.
- This is one of the cases in which Carmen and Jack interact with each other.
- In the "Earthquake Site" crime scene, you can spot a portrait of Indian leader Mahatma Gandhi.
- The "Rising Hope", mentioned several times in this case, may be a parody of International Red Cross.